
Close Window
How to Hot Wire a Power Supply for Accessory Testing
| Author: | Jason Dumbaugh and Michael Lynch |
| Date: | 2007.04.02 |
| Topic: | Misc Mod |
| Provider: | TechwareLabs |
| Manufacturer: | TechwareLabs |
| Author: | Jason Dumbaugh and Michael Lynch |
| Date: | 2007.04.02 |
| Topic: | Misc Mod |
| Provider: | TechwareLabs |
| Manufacturer: | TechwareLabs |
Today we’re going to cover how to do a quick “hot wiring” of a power supply so you can test your new fans, lights, etc. Now you may be asking yourself “why would I need to do this?” Testing certain components and systems is often ideal to do outside of your computer case so that you do not end up harming your system. Such as testing out a water cooling system, new fan, TEC element(to find hot and cold sides), wiring components, testing UV cabling etc. Additionally it’s not so much a “need,” more of a “because it’s easier.” Imaging finding out that your new water cooling system is not sealed properly once it's inside your case.
Normally the PSU would have to be connected to a motherboard, powered, added to a power switch……too much work. Not to mention installing those components that you want to test and possibly having to uninstall them when you find there is a problem. With this guide all you will have to do is plug the PSU into the wall and plug the components you wish to test into the PSU.
The best part of this guide is that you can use any left over power supply without having the overhead of powering a system. This means much more power available to you for testing out power hungry components.
SAFETY NOTE: Make sure the PSU is turned OFF before testing so you don’t have an accident.

A normal power supply from any leftover case.
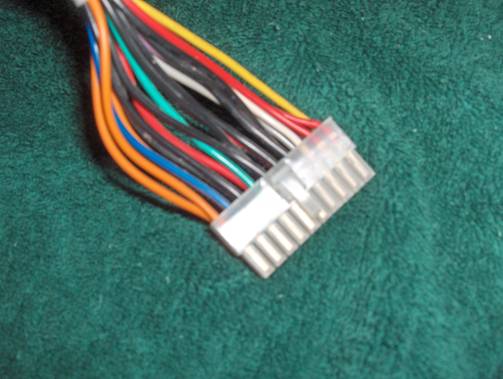
Locate the 20/24 pin power plug that normally goes into the motherboard.
1. Cut a piece of wire, about 3” in length, of gauge 18 or 20. If it’s much higher, there’s a risk that the wire will get too hot. For ease of use you can use wire from any leftover molex Y adapter, extension, or similar cable. DO NOT CUT CABLING FROM YOUR TEST PSU AS THIS MAY LEAD TO AN ELECTRICAL SHORT.
2. Strip both ends of the wire of the wire approximately 1/4 inch so that you have bare wire. Twist the bare wire so that the ends do not fray out and cause potential shorts.
3. Make sure the power plug to the PSU is off before plugging wire into the contacts in the PSU motherboard connector, and make sure not to touch either end of the bare wires with your fingers.
Plug one end of the wire into the 20 or 24 pin power connector using the green wire.
4. Connect the other end to one of the black wires which is the ground.
5. The switch at the back of the power supply will now act as an instant on and off for the power supply. Before connecting your components, flip the switch to the on position and your power supply should turn on as well as the cooling fan in the power supply. If the fan does not come on shut the switch off, unplug the power supply and re-check your connections. If the connections are good and the power supply still will not turn on then your power supply may be bad or faulty, disconnect and use no further. If it does turn on and the fan moves then you should turn it off and connect your components to any free cables coming from the power supply. Once connected you may now you may turn on the switch and test out your components.


