
Close Window
Logisys Clear Acrylic Blue Case
| Author: | Justin Washick |
| Date: | 2008.05.21 |
| Topic: | Audio |
| Provider: | Logisys |
| Manufacturer: | Logisys |
| Author: | Justin Washick |
| Date: | 2008.05.21 |
| Topic: | Audio |
| Provider: | Logisys |
| Manufacturer: | Logisys |
![]()
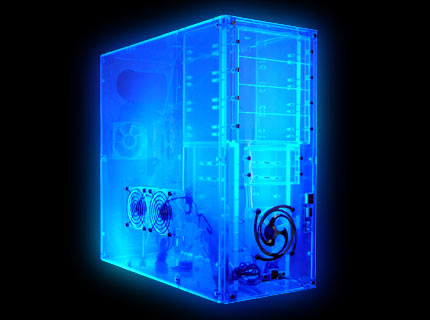
With my new package having arrived, I'm greeted with the sight of the unique UV Acrylic Case from Logisys. It is a see-through acrylic tower case that offers plenty of room to build/upgrade, and allows you to show off your high-end goods. There does not seem to be anything particularly special about this seemingly odd-looking case, but its sole advertisement is that it is UV-reactive. Does this case come ready to impress, or will it be a letdown? Come with me as I explore the design of this case and find out if the Logisys UV Acrylic Case is a good purchase.
The obvious aspect that anyone will notice is that this is anything from your typical computer case. The interesting part that may be the determining factor is that this case is said to be UV-reactive, so I'll be throwing in some UV lamps, but that assessment will come later during testing.
 |
 |
First glance |
After pulling from box |
 |
 |
After removing styrofoam |
After removing bubble wrap
|
As specified on the box, this case comes pre-assembled where all of the panels are screwed together. This wouldn't necessarily be bad, but there are a grand total of nine (9) screws holding on each panel, and in order to get to the other side to secure any optical/hard drive, the easier option still requires removing the other panel, which means a grand total of 18 screws have to be undone.
 |
 |
 |
Onside |
Front |
Front (close-up) |
 |
 |
Side fans (close-up) |
Side (removed) |
As I pull off the side panel and gaze inside the case, I see a very spacious interior, and will fit any motherboard up to an ATX size. The case is roomy enough to work with, yet the case itself is not too large to fit on/under a normal workstation.
I see four fans: 1 in front, 2 on side, and 1 in back. The circuit board for the power/reset buttons and the USB/audio jacks are visible, but this is only a minor consequence of the entire case being see-through.
Real Time Pricing:
![]()
Most of the obstacles in setting up a system in this case were as expected. The quantity of screws is loads of fun, particularly when securing the opposite side of the optical/memory drive. There are not any special features included with the case, so set-up is comparatively easy to one that is more complex. There are relevant plugs to give functionality to the power button and little else. There are also feet included such that the entire surface area of the bottom of the case does not create friction upon being slid around, and these feet are attached via an adhesive strip where you remove the paper covering before attaching.
The picture below and furthest to the right shows a step to installing an optical/memory drive. After unscrewing the opposite side panel, very carefully lay it down as not to disturb any current set-up more than necessary.
 |
 |
 |
Side removed |
Feet & screws (included) |
Foot attached |
 |
 |
Motherboard attached |
Opposite side down |
One thing I'm particularly disappointed about is the way you're supposed to secure the power supply. Most cases have a housing for the power supply, or even a lip to help support the weight. For some reason, I'm supposed to expect four little computer screws attached to one end will hold up the entire weight of the power supply. Bearing in mind that there is no support whatsoever for the opposite end, anyone who has studied high school level physics may see a slight problem here. Several weeks have passed and the power supply has not yet collapsed, ripping the heat sink off of the motherboard, but it does not seem safe nonetheless. After all, there will be some effect due to vibration over time.
 |
 |
5.25" bays |
Onside |
 |
 |
Top |
Front |
There is, however, plenty of room after attaching all of the relevant cables, and with the four UV-reactive fans, there should be no problem with air flow. That reminds me... we mustn't forget the UV lamps...
I turn the power on...
 |
 |
 |
My Precious |
||
As disappointed I am in the overall design, I have to imagine that the acrylic material isn't as easy to work with as would, say, plastic or aluminum. There is a real concern with trying to work with this material whilst keeping it from cracking, so there's really nothing you can do to sidestep the quantity of screws (versus making the side panel slide in and out of the case). To circumvent this problem, just don't replace all of the screws until you're done working on the system. The disappointing part, though, is the lack of support for the power supply, as some other acrylic cases on the market seem to have at least a sort of ledge for extra support.
As much as I would have liked to have seen an easily removable / reattachable side panel that uses two thumb screws to secure in place, the multitude of screws is only a minor annoyance considering how often one would need to open/shut the case once a system is up and running. And despite my other gripes concerning the design, the Logisys Acrylic Case prices in at a very affordable $60 from xoxide.com (link for blue; red and green also available). In all honesty, it's difficult to beat that price without ending up with a very boring aluminum case.
All in all, this is a great eye-candy computer case, assuming you have space on top of your desk to show it off. If you don't have space on top of your desk, do some spring cleaning and make room. It almost seems criminal to stuff this UV-reactive case underneath a desk.
Real Time Pricing: