
Close Window
Logitech WiLife Security System
| Author: | Michael Lynch |
| Date: | 2009.01.14 |
| Topic: | Security |
| Provider: | Logitech |
| Manufacturer: | Logitech |
| Author: | Michael Lynch |
| Date: | 2009.01.14 |
| Topic: | Security |
| Provider: | Logitech |
| Manufacturer: | Logitech |
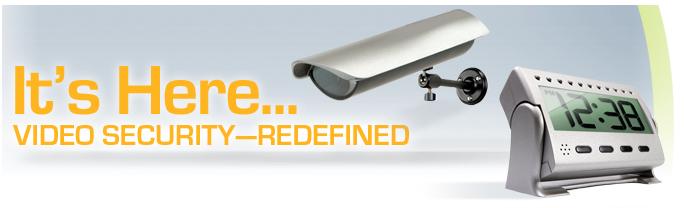
Just over a month ago we reviewed a low budget security system, the Logitech WiLife Security System. For being priced under $300, the WiLife Digital Video Security System (DVSS) offered some pretty amazing features. As the starter system that was provided included the Command Center software aswell as the indoor camera (other starter systems are available that include the outdoor camera and the spy camera). The review on the Logitech WiLif DVSS took a look at the system as a whole, whereas with this review we are going to take a more detailed look at each of the cameras offered as part of the WiLife System. We are going to being taking another look at the indoor camera that we seen last time in addition to the Outdoor Camera and the Spy Camera.
Lets go ahead and see what Logitech had to say about thier security system and see if it really is the wonder they say it is.
" The WiLife Indoor Security Camera Starter Kit includes all the components for a full-featured, single camera system with three mounting options. Each kit includes a smart Security Camera, powerful Software, and free Remote Viewing Technology. Built using Universal Plug and Play (UPnP), WiLife automatically connects your cameras and PC. "
- WiLife
The WiLife Security System was packaged exquisitely. With the availability for the customer to see the camera when glancing at the box, allows them to one make sure there are no damages to the product and two take a look at what the physical camera looks like.

Shown in the picture above it the front of the packaged box. As you can see in it, the camera is shown through the clear plastic packaging along with some quick details.

When you turn the package over to the back is when you get a good look at what exactly the device can do. With the back panel opening up, like a book, you can see in more details what the Wilife security system is capable of doing. It gives you a brief overview of the quick installation, the command center, and the technology used.
As you can see in the image below, the WiLife Security System came packaged with many parts. Listed below are the components included:

Unlike the indoor and spy cameras, the outdoor camera packaging doesn't have a clear plastic window. I am unsure why the opted to do it without a window, but I am sure they had thier reasons. Looking at the back of the case, you will notice that there is a picture of the command center which is labeled to describe all of its features.
 |
 |
 |
|
The camera was packed with cardboard to help it stay in place.

The outdoor camera came with the camera, mounting bracket, warning stickers, and the usb receiver. The physical camera itself is quite large, it is the largest of the set of cameras just being larger than the spy camera.
 |
 |
Its slim sleek design makes the camera very low profile but it still remains large in size. The camera can be attached to the mounting bracket from either to top or the bottom of the camera. This allows for maximum placement of the device.
 |
 |
 |
As you can see in the image below, the WiLife Security System came packaged with many parts. Listed below are the components included:
Similar to the packaging of the indoor camera, the spy cam has a clear plastic window allowing the customer to see the physical camera before taking it home. This will help insure the customer that the unit has not received any damage in shipping or by any other means. It also allows the customer to get a better feel of the physical size and shape of the unit. Looking at the back of the case, you will notice that there is a picture of the command center which is labeled to describe all of its features.
 |
 |
 |
 |
 |
|
Taking the camera out of the package we see that it packaged very well with large amounts of space around the device to help insure no damage comes to the unit itself. It comes with the camera along with the power cord the is used to plug the clock into the wall. Also included is the receiver that will be plugged into the computer.
 |
 |
 |
|
The spy camera isn't physically that large, about the size of you standard digital clock. On the front of the camera is a set of four buttons, one allows you to switch between hours and minutes, a plus and minus button used to change the displayed time, and a button that will change the displayed time to be either in 12 hour intervals (using AM and PM) or in a 24 hour interval. The camera is able to be tilted foward and backwards to help insure the angle that you desire.
 |
 |
 |
 |
 |
|
The camera itself is a pin camera that is located in the second whole from the right side. It is virtually undetectable unless you are actually looking for it.
 |
 |
As you can see in the image below, the WiLife Security System came packaged with many parts. Listed below are the components included:
Basic
On the previous three pages, we talked about the packaging and contents of each system aswell as listed the technical specifications of each camera. Here, we are going to briefly go over each of these specifications and describe how each camera differs from one another.
The main thing that you look for in a camera is its ability to take video and transmit that to the receiver. Its ability to do this is greatly dependent on the processing power of the camera itself. All three of the WiLife cameras come standard with a 400 MHz DSP processor. DSP stands for Digital Signal Processing, which has now become a standard for most digital cameras. The speed of 400MHz may not sound like alot when talking about processor power today, but 400MHz is plenty enough for its purpose. The 400MHz DSP processor takes the video it recieves and encodes it as a Windows Media Video 9 file.
The cameras also record in either VGA (640x480) or QVGA (320x240) resolutions. The 640x480 resolution may be considered small, but it is large enough to see everything that is going on at any given time.
They can also record at 5, 10, or 15 frames per seconds. This would have to be one of the major downfalls of the system, max record at 15 frames per seconds. Viewing a video at 15 frames per second is a little choppy, but if there is no fast motion you can make out what is going on. But in the case of someone running by or any fast motion the video will be blurry and rather laggy.
The last configurable setting that you can choose is the bit rate. The bit rate is able to be configured at either 400, 600, or 800 kilobits per second.
All of the WiLife cameras have upto 16 programmable motion detection zones. These can be used if you have a tree that keeps blowing in the wind that triggers the motion detection. Its a simple selection of where you want the camera to detect movement. Also the cameras come with adjustable brightness and contrast settings to manuall configure the proper amount of light but incase you dont want to mess around with that, there is an auto brightness setting that will automatically change the brightness. This is a great feature when using an outdoor camera as there are different amounts of sun light throughout the period of a day.
Looking at the Lens on the cameras, we notice that each lens has a diagonaly viewing angle of 80 degrees. Although the indoor camera is able to swivel around gaining an additonal 50 degrees. Both the outdoor camera and spy camera have a preset focus, which you are unable to change, whereas the indoor camera has a focusable lens. Also all cameras have the availability to be update manually or automatically.
A list of features of the entire system check out our review on the Logitech WiLife Security System.
One of the hardest parts to installing a home security system is undoubtedly running all of the wires from each camera to your central security box. WiLife makes this mundane task and tosses it out the window by introducing a wireless system. By using the Home Plug 1.0 technology, the WiLife Digital Security System sends the video data over the power lines to anywhere in our home or small office. WiLife claims to have a " 15 minute hassle-free installation ". Normally, I tend to believe these claims have no validity behind them, but lets see if this system truly stands up to its claim.
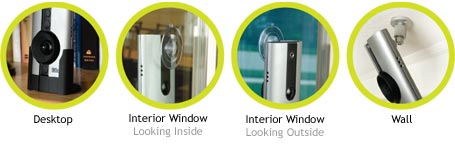
The installation involved with the WiLife Security System is very minimal. With the availability of installing the device using four different mounting options, you can easily get the exact camera angle that you are looking for. The four types of mounting are: Desktop stand, Interior Window, Exterior Window, and Wall Mounting. You can see an example of each of these shown below.
To complete the installation of the system, there are three easy steps.
Step 1: Install Software to be used to monitor the system
Step 2: Connect Wireless receiver to computer via USB
Step 3: Indoor Camera: Connect Wireless transmitter with the Camera via ethernet cable
Outdoor / Spy Camera: Connect power plug into nearest outlet
 |
 |
Indoor Camera: Overall the physical installation of the indoor security camera was quite easy. The only requirement of where you must place the camera, which is that it must be located near a power outlet. But the ethernet cable included is 10 feet long, so you shouldn't have to much problem trying to place the camera, but if you do then any ethernet cable (up to 80 feet) will work fine.
Outdoor Camera: The installation of the outdoor camera was a little more tricky than the installation of the indoor camera, but still extremely simple. Being mounted outside, I had no choice of what type of mounting I choose as I did with the indoor camera, so I had to use the mounting brackets included. Mounting the system required screwing the mounting plate to the side of the house and then attaching the camera to the plate with the adjustable arm. Once in place simply tighten the adjustable arm in place so it wont move.
Spy Camera: Ultimately the easiest to set up. Simply plug the camera into the nearest power outlet and thats all.
A full explaination of the workings behind the WiLife Command Center, please check out our review on the Logitech WiLife Security System. We were previously unable to check the multi-camera functionality of the command center, so now that we have the additional cameras we were able to test it out. The rest of the page will be showing the multi-camera functionality of the command center.
As you can see in the following pictures, the three different views were tested and no problems arouse. These screen shots were taken when the camera was pointed directly at a wall, only inches in front of it, thus explaining the complete darkness.
Single Camera |
Four Cameras |
Six Cameras |
 |
 |
 |
In live mode, the bottom segment of the command center has status lights for each of the attached cameras. As you can see in the images, there are three cameras detected and all turned on. This is showing correctly as we are only using the indoor, outdoor, and spy camera.

The playback mode allows you to see the videos that were previously recorded. This shows you a list of all cameras attached along with their corresponding recorded times (shown by highlighted segments on the timeline).

After the camera was installed, and the software installation was finished, the Command Center automatically found all my cameras and added them to the system. Testing the motion envolved me walking in front of the camera and check to see if it recorded. I tested by walking at normal speeds, running, and tip toeing.
Walking: The cameras captured me walking by fine, with no problems at all.
Running: Running past the camera I initially thought that either they wouldn't catch me or maybe it would be very burry. It definatly was able to catch me running past and yes it was slightly blurry but I was still able to make out the figure.
Tip Toeing: The ultimate test was to see if the cameras would be able to catch me if i were to sneak past them. I first tried to just walk very slow and then when that failed I tried to crawl. Both of my attempts resulted in failure as the camera was able to detect me.
No Action |
Motion Detected |
 |
 |
 |
 |
 |
 |
No matter how slow I walked or crawled, the camera still was able to pick up the movement. This happened both when the camera had no predefined motion zones and when I walked through the motion zones.
 |
 |
Overall I would have to say that the quality of the system was very impressive, with the motion detection picking up the slightest movements, which will catch even the sneakiest of people.
The use and functionality of the WiLife Cameras were quite amazing. There is a camera available for every situation. If you want to try and be discrete there is the spy camera, or maybe one to hold up to the weather there is the outdoor camera. Overall all cameras gave a superior quaility video with a very simple setup.
![]()
If you haven't yet read the review on the Logitech Wilife Security System, please read it as it goes more indepth of the entire system itself.