The Resurrection Part II
Review by Shadrach on 05.01.2002![]()
- Page 2 -
Creating the Template
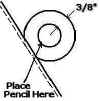
Before cutting the hole, an outline must be drawn as a guide. The outline must be approximately 3/8" larger than the Plexiglas on all sides. To accomplish this, a washer is included with the kit. To begin making your outline, position your window where you would like it.
Placement Tips:
- Take into account what will be showing through the window when it is completed. Too far forward, you will see nothing but your drive bays. Too far up, and you will see the side of your power supply.
- The mounting strip will stick out 1/2" from where the window is placed. Compensate for this prior to cutting and don't cut too close to an edge.
Click on the picture for larger image
|
Click on the picture |
With the window in place on the inside metal (non-painted side), set the washer next to the window and trace an outline around the entire window. The width of the washer metal from the inside to the outside is approximately 3/8". This will create a large enough gap for the mounting strip. Pretty ingenious simple way to create the correct gap. |
Cutting the hole
With the lines all laid out, your ready to begin cutting. A hand held hobby cutter can be used with a cutting wheel (better have about 4-5 extra wheels on hand if you intend to use this method). The preferred method would be a jig saw with a fine tooth metal blade. To begin, drill a hole in the metal close to the template you just drew. The hole should be large enough to insert the blade of the jigsaw. Drill-less? Punch a hole with a screw driver or you could John Wayne the saw into the metal by starting at an angle (cutting edge down) and cutting your way down until the blade penetrates the metal. This method can be destructive to the blade, better be sure you have spares.
Tips for cutting:
- Cutting should be performed with the painted side down to keep from scratching. If this is not possible, you can draw your outline on the painted side. Mask the entire area before cutting to keep from scratching your paint.
- Elevate the piece you are cutting with two pieces of scrap wood placed fairly close together. The placement of the wood will keep you from needing to hang the metal over the edge of you workbench or table. The strips of wood will also prevent vibration. Large pieces of unsupported metal tend to vibrate violently when being cut and can cause a not-so-straight line. Re-adjust the blocks as you cut.
- Let the blade do all the work!! You should apply some pressure in the direction of the cut, but overall should only guide the saw around.
- There is the possibility of needing to cut close to the panel side where an edge will be sticking up and in the way. Find some small strips of wood to elevate the saw. This will enable you to keep the saw perpendicular to the piece your cutting.
Once you have finished cutting the hole, it should be cleaned of all burrs and sharp edges with either emery cloth or a metal file to prevent injury. With the hole complete, it is on to the fun part. Mounting the window.


