|
ASUS Striker II Extreme Motherboard
 |
BIOS:
When we first boot the ASUS Striker II Extreme motherboard, we are greeted with a full-screen splash of the ROG logo.
After presseing Delete, we enter our setup. The screens are as follows:
Extreme Tweaker:
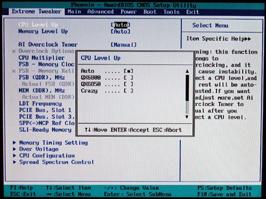
This is perhaps the coolest part of the ASUS Striker II Extreme BIOS. The first option is "CPU Level Up." This is the ASUS tool that allows your CPU to emulate other CPUs speeds. It is an automatic overclock, and ASUS handles all the tweaks for you. While using our Intel Q6700, which runs at 2.66GHz, we had the option of leveling up to the QX6800 at 2.93GHz, the QX6850 at 3.00GHz, or Crazy at 3.50GHz. There is also a Memory Level Up option, which offers a much larger range of levels. We can choose from Auto, PC3-11600, PC3-12800, PC3-14400, PC3-16000, PC3-16800, PC3-17600, and Crazy-19200. The RAM we tested ranged from PC3-11000 (1375MHz) to PC3-14400 (1800MHz). This leaves a HUGE amount of room for overclocking this motherboard.
We obviously tried and benchmarked all three of the CPU Level Up options for you. Those results will be shown on the next page. Obviously, all of the spots where you can enter in the FSB and DDR clock are located on this page, as well as the memory timings, overvoltage of the CPU or RAM, CPU configuration, and Spread Spectrum Control.
Main:
In main, we can view which drives are assigned to our IDE and SATA connections, as well as set HDD SMART control, and system information.
Advanced:
Here we find AI NET 3, PCIPnP, Onboard Device Configuration, USB Configuration, IDE Function Setup, Serial-ATA Configuration, and LCD Poster and Onboard LED Control. I'd like to note that the RAID setup is under Onboard Device Configuration, and will bug you about a JMicron IDE Controller unless you set this to disabled. The LCD Poster and Onboard LED Control section lets you control the ROG light on the motherboard as well as the Voltminder LEDs on the motherboard reminding you about overvoltage.
Power:
Here we have the ACPI Suspend Type, APM Configuration, and HardWare Monitor. If you're using a liquid cooling system, you'll need to go to the HardWare Monitor and disable the CPU Fan speed warning.
Boot:
In the boot menu, we find our standard Boot Device Priority, Removeable Drives, Hard Disk Drives, CDROM Drives, Boot Settings Configuration, and Security.
Tools:
The Tools menu contains the ASUS O.C. Profile, where we can save our overclock settings, and the ASUS EZ Flash 2. This allows you to update the BIOS with ease.
Exit:
The Exit screen is pretty self explanatory. You have the option to Exit & Save Changes, Exit & Discard Changes, Load Setup Default, Discard Changes.
Real Time Pricing:


