

|


FIND THE TAGAN EL DIABLO CASE ONLINE TODAY
An Even Closer Look
 |
 |
 |
 |
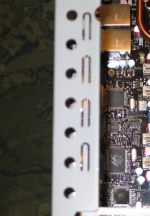
| Case inside | HDD cage, empty | Screw holes | Expansion slots |
Opening the case, we see a large main compartment, with drive cages towards the front of the case. The hard drive cage uses a set of six plastic frames that wrap around the bottom edge of the drive, holding on to it with short metal pins. Your Humble Reviewer had some initial concern about accidentally breaking these frames while trying to install a drive, but this proved to be unfounded, as they had ample flex to them. Removing the frames, an oddity manifests itself: there seems to be a metal box of some sort wedged in between the cage and the front intake fan. This would seem to obstruct airflow to the drives, but in practice it was not an issue.
Another oddity shows up as we look to the rear of the case, to the expansion card slots. Each slot cover is secured by a thumbscrew, but directly above these is a large metal lip, with circular holes drilled in it to admit a screwdriver. Ordinarily this would not be an issue, but the thumbscrews were screwed in very tight, to the point where fingers alone could not get them turning. Your Humble Reviewer is not the most nimble-fingered of individuals, and the positioning of the thumbscrews made it impossible to get a really firm grip on them. Not having a long enough screwdriver to hand, I eventually had to resort to a pair of needle nose pliers to "un stick" the thumbscrews. If you are in the habit of using a multi-bit screwdriver, a long #2 phillips bit is recommended here.
 |
 |
 |
| Front bay, installed | Main compartment, installed | HDD cage, installed |
Installing the DVD+/-RW drive was utter simplicity, requiring only the fitting of a pair of drive rails. The rails attach to the drive with smooth, rounded pegs, so a bit of pressure to either side was required to keep the rails in place while the drive was slid into place.
Installation of the motherboard required that the nine standoffs be fitted to the correct holes, a process rendered unnecessarily difficult by a lack of adequate labeling. Locating the correct holes requires reference to a legend stamped into the motherboard tray itself, which is difficult to read even with a flashlight. The manual is no help in this regard either, so don't bother.
The power supply slotted in with equal ease, with room to spare. Extended power supplies provide no difficulty, though if you do not have a modular power supply, care should be taken with securing the extra cables. Simply tucking them in on top of the PSU will likely cause them to come into contact with the rear top exhaust fan, which has no grille or other protective mechanism on the lower side. In fact, the large side-panel fan is also left largely unprotected on the inward-facing side, which can lead to a nerve-rattling, machine-gun-like clatter if any loose connectors or cables come into contact with the fan blades.
Getting the hard drives into their plastic frames was a bit of a trial, but once that was done, the drives slid in and snapped into place with no fuss. Getting the power and data cables connected was similarly easy, though the power connector cables had to be bent a bit to clear the plastic rail across the back of the drive. Use of right-angle plugs for both data and power is strongly recommended here, as there is minimal clearance between the HDD cage and side panel.
 |
 |
 |
 |
| Cable spaghetti | Not far enough | A bit off | ...and a bit more off |
Once the major components were in place, the next step was to connect all the power and data cables, and this is where more problems became apparent. Most of the fans are connected to a small circuit board bolted to the bottom of the case, but this is impossible to tell at first glance, as it is obscured by a rat's nest of unsleeved and unmanaged cables. The cables coming down from the top are gathered in a plastic wire-loom, but these cables are disturbingly short, and in the case of the front-panel USB2 connector, not even long enough to reach the header pins on my motherboard. (See 2nd image above for an illustration). Attempting to get these cables into some sort of order, Your Humble Reviewer found there was no place for the excess lengths of cable to go. In a more permanent installation, copious amounts of zip ties and restraining clips would be required to tame this jungle of wiring.
With everything hooked up, the last remaining step was to screw everything down and close the case. Attempting to affix thumbscrews to the back panels of audio and video cards, Your Humble reviewer found further cause for distress. As the third image above shows, the screw holes do not line up with the slots in the panels when the cards are firmly seated. Getting the holes lined up required lifting up the back edge of each card, which, while functional, presents some concerns about stability in transport. The side panel exhibits a similar problem, as the holes in the door do not quite line up with the holes in the chassis. Your Humble Reviewer is unsure if these are the result of a manufacturing defect in this unit, or a design deficiency, but these issues are worth noting either way.
REALTIME PRICING