

| Spiderman 3 Venom Project Part 1 |
|
|


With the new Spiderman 3 movie coming out, we’ve decided to make a Spiderman case with the Venom ooze. One of our favorite things to do is make superhero cases, and we haven’t done a Spiderman case before. We plan to use zinc sheet metal to cut out the Spiderman spider, as well as black caulking for the Venom ooze and the chrome webbing. Since This case has a mesh front with a space before the fan in the front, we’re going to put a Spiderman “3” in front of the fan with a brushed steel effect.
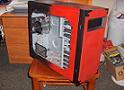
We decided to use the ULTRA Grid case for this tutorial because of it’s
simple layout, large window, and see through grid front.

You will need:
1 ULTRA Grid case
1 can KILZ primer
1 can gloss red, 2 cans gloss black Krylon spray paint (available at Wal-Mart)
2 cans of Krylon clear acrylic spray paint
1 tube of black DAP latex caulking
a caulking gun and flat scraper (in case you mess up the caulking)
1 sheet of 12”x24” zinc 26 gauge sheet metal
1 sheet of 1/8" plexiglass
1 can of 3M Super 77 spray adhesive
2 red Lazer LEDs
1 80mm Black spider fan grille
some type of sandpaper or triangle sander with 220 grit paper


We decided
to turn this case into the standard Spiderman logo being engulfed by Venom’s
black ooze. Here’s a quick sketch of what we want it to look like in the
end.

There will be a red 120mm LED fan behind the “3” on the front, and the “3” will be behind the red mesh.
First we Googled Spiderman 3 looking for their logo. We came up with this picture and loaded it into Adobe Photoshop to remove the background so we could get just the spider image.


We then took a trip out to Home Depot and picked up a sheet of 26 gauge 12”x24” zinc sheet metal for $5.17 and some black DAP latex caulking for $3.29. After that, we traveled to Wal-Mart for some gloss red and black Krylon spraypaint for $2.97 each.

Consult the Easy Painting Guide for spraying. You only need to go about 60 or 70% across the panel with red, and 50% with the baclk coat. (MAKE SURE YOU ARE SPRAYING THE SIDE AWAY FROM THE BACK GRIP).

While this dried, we moved on to the window side panel. First, pull the 12 black pins out of the side. This will let you pull their anchors out, letting the glass panel free.


Follow the Easy Painting Guide for this panel as well.

Set this panel aside because we’ll be affixing caulk (web) to this later on.
Let’s turn our attention to the window we just removed from this panel. It looks somewhat ugly with the extra mesh around the ULTRA grille, so we decided to take it apart and use tin snips to remove the excess mesh from around the grille.


Now we're going to remove the front panel of the case by pressing the three pins together on each side (third not pictured):

Remove the two pins from the hinge by pulling out the small black circular tabs (DO NOT LOSE THEM). You can then remove the door of the front panel. Remove the screws in each of the four corners, which will allow the front corner pieces of the door to come off.


Carefully bend the flanges holding the grid mesh on so that it may slip out of the door. There are two on the top and bottom, and three on the sides. Peel the ULTRA sticker off of the front and save it to replace later on. WITHOUT PRIMING, gently spray the grid mesh from a far distance with a few very light coats, so that the paint does not clog the mesh holes. After it fully dries, spray with 4-6 coats of clear coat.

After the clear coat fully dries Reverse the past few steps by putting the ULTRA sticker back on, pushing the mesh back into the door, and bending the 10 flanges back in.


We personally did not like the black buttons that hold the corner panels of the door on, so we pulled them out and sprayed the four of them red, along with 7 of the buttons from the window panel. No primer was used. We used 2 coats of red, followed by 3 coats of clear coat. Use these coats at your own discretion.

After the buttons have fully dried, put them back into the corner panels and screw them back in. Leave the front door to the side - we will be spraying the case next.
Take out all loose parts from the case, and tape off anything that may get colored inside the case while we paint the lid and back of the case, including any fans.

Again, the same rules apply for painting, see the Easy Painting Guide if you still don't remember how to do this.


Spray the BACK of the case with about 6-8 coats of clear acrylic. Trust me, it will be nice and shiny, and less inclined to scratch paint off.
If you’re DYING to check your progress, wait until EVERYTHING is dry, then you can temporarily piece it together. This is optional, since we will be taking it apart again for our next steps.

Check back later for the next part of our Spiderman 3 Venom guide when we apply the Spiderman webbing and venom ooze!
| « Back Home | More Guides » |