| Antec Veris Multimedia Station E-Z |
| Author: |
William Halbyrd |
| Date: |
2008.10.15 |
| Topic: |
Peripherals |
| Provider: |
Antec |
| Manufacturer: |
Antec |
|
|
Antec Veris Multimedia Station E-Z

Setting The Stage
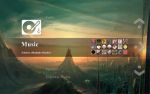
iMedian HD is the heart and soul of the Antec Veris Multimedia Station software suite, and it's where you'll be spending most of your time.
|
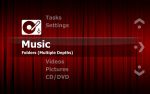
Home, Sweet Home... |
After a brief intro splash screen, we're presented with the main menu. Here, you can get quick access to your music, videos, and pictures, as well as any external media. This program's handling of external media is particularly nice—plug in an external hard drive, flash drive, memory card or other disc drive, and iMedian sees it. After a quick "should I use this?" prompt, it presents the contents of the drive separated into music, videos, and pictures—just like your internal files. It handles Windows network shares with equal aplomb, allowing you to access media files from other devices on the network with no extra hassle.
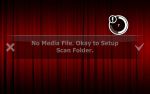 |
Where'd everything go? |
When you select any of the three main media types, iMedian presents you with the contents of your <username>\Music, <username>\Videos, or <username>\Pictures folders, depending on which type you chose. If it can't find those folders for some reason, it will ask you to tell it where to look. As you can see here, the prompts can be a bit Engrish-y at times, but they are pretty easy to interpret. Once you've told it where to look, it will ask you if it's okay to begin scanning the folder you've selected. My suggestion is to say no, and continue until you have all the scan folders set up in all three categories, then rescan the folders in each category. The reason for this is, the scan is thorough and aggressive, and the program will not see your media until it's done. Folders with a large number of files and subfolders take longer than folders with a few large files, so you might end up with some downtime if your collection is particularly large.
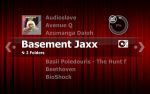 |
Library navigation |
Once the scan is done, your library is presented in a list format, with the title in large text and the metadata below in a smaller font. Preview images or album art appear in a small window in the upper left corner, though only for the currently highlighted item. The default font is large and easily readable, which is both good and bad. Good, because you will not have to strain to read it. Bad, because long filenames get truncated. The list items will scroll slowly from right to left to display titles that are longer than can fit on screen at once, but this can be frustrating if you have a lot of files in a given folder that all start in the same way. Curiously, among the plethora of options contained in the Settings menu, I could not find one to reduce the size of the menu font. With options for adjusting the subtitle font readily available, this is an odd oversight. This issue can be partially gotten around by choosing a narrower font—Times New Roman works well for this—but it's still a bit of a fly in the ointment.
 |
All Tricked Out |
Almost everything else about the program is customizable, from the menu font and background to the nitty-gritty details of subtitle rendering and display colorization. The level of adjustability is almost overwhelming when taken as a whole, but it is all neatly laid out in nested menus that make it simple to get to the option you're looking for.


