

|


Logitech WiLife Security System
 |
Software:

One of the main parts of the Wilife Security System is the fully featured Command Center. The command center offers support for up to six Wilife cameras, in any combination of the three available. As you can see in the picture below, you can easily switch between a single camera view, 4 camera view (screen split into quarters), or 6 camera view (one main screen surrounded by 5 miniature versions) with a simple button located in the top right corner.


Located just below those buttons, are three circular buttons to help navigate thought the command center. The first button is to enter the setup, which allows you to change all of the advance features. The second button will alternate through Live View and Playback. And the third button will navigate you to the Wilife web site. Upon opening the setup window you will see the following window.
In the setup window, there are the following five tabs: Camera, Recording, Email, Remote, and Advanced. See below to see what each field does.


Camera:
Under that camera tab, you are able to input a camera name for each of your cameras. As well as place where you want the name to be displayed and what color the text should be. You can also manually adjust the brightness and contrast of the camera or set it to Automatic Brightness. The final options that you are able to change is the quality of the image, theses settings include those like resolution, frame rate, and bit rate. You have it ability to adjust it from 5 frames per seconds, 320x240 resolution, and 150Kbps to 15 frames per seconds, 640x480 resolution, and 800Kbps. The last choice that you have is to enable to motion LED, disabling this will turn all lights on the camera off which will allow for it to have "complete stealth".
Recording:
Under the recording tab, you are able to change the sensitivity of the camera. You can also set up to 16 motion detection zones for each camera. Only motion within these zones will trigger the system to record. These zones prove to be very useful when you have things like trees that will cause your camera to keep miss-triggering. As well as view and edit the scheduled recording time or the amount of disk usage you wish to dedicate towards recorded video.
Email:
Under the email tab, you can setup your wilife system to alert you via email or sms message alerting you that motion has be detected. You are able to fine tune this by setting a minimum motion time, default is three seconds, but can be changed easily. Setting up the email portion is very similar to setting up your email in microsoft outlook, asking simple questions like your email address, username, password, and what your outgoing mail server is, along with whom you would like the email sent to.
Remote:
Under the remote tab, you can setup the remote access feature. This will allow you to view your cameras at all times via Wilife's web site. This is only recommended if you have a broadband internet connection or faster. The first thing that you will need to do is create an account on Wilife's web site which will help you configure your cameras to be remotely accessed. Once created there is only a few more painless steps required before you can start to view all of your cameras remotely.
Advanced:
Under the advanced tab, you are given the more intricate options. Such as manually adding a new camera or having the system rediscover all of your cameras again. Change the password to help protect your camera network. Update the command center and the cameras. Set a time that the system will restart. Along with a few special operations for stored video segments.
Back on the Command Center, below the buttons you will notice the enhanced camera options. These can be used to zoom and pan the cameras, then save those views as a preset.
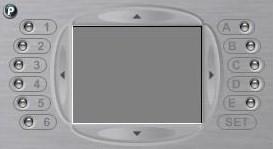
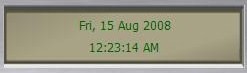
Just below that is the time and date, whether current time if viewing in the live view, or the time in which you are currently viewing if in the playback mode.
The final part of the command center in the bottom controls. Depending on which mode you are in (live or playback) you will notice different options. See the picture below to see the various options.
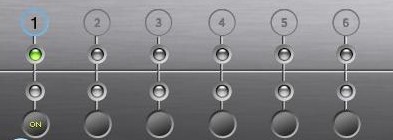

Now, while in the live view, you will notice a simple status light for each camera. In the image you see above, there is only one camera that is being used, so camera 1 is on, while cameras 2-6 are off. While in the playback mode, you will notice that the bottom controls have been converted to a playback timeline in which you can select the exact time you want to start watching at. Located in the bottom right corner is the play controls, allows you to play, pause, and change the play speed, shown below.

That pretty much wraps up the Wilife Command Center. As you can see, it is pretty powerful. Nearly every feature that I can think of was integrated into the command center.
REALTIME PRICING