Introduction
The Z77 chipset represents an interesting new trend from Intel–one of backwards compatibility. Unlike in previous generations, where a new motherboard necessitated a new CPU and often new RAM, the Z77 boards are backwards compatible with existing LGA 1155 Sandy Bridge CPUs. Since no LGA 1155 Ivy Bridge CPUs are yet available (at time of publication), this is good news for those looking to upgrade their system without dropping a huge load of cash all at once.
Since this board is backwards compatible with existing Sandy Bridge CPUs, the obvious question is: how does this board perform with current generation CPUs? Today we’ll be taking a look at the ASRock z77 Extreme6, a mid-range enthusiast board centered around this new chipset.
Some of the highlighted features include:
- Premium Gold Caps
- Digi Power Design, 8 + 4 Power Phase Design
- Supports Dual Channel DDR3 2800+(OC)
- 2 x PCIe 3.0 x16 Slots, 1 x mini-PCI Express slot
- Supports AMD Quad CrossFireX™, CrossFireX™ and NVIDIA® Quad SLI™, SLI™
- PCIE Gigabit LAN
- Supports Intel® HD Graphics with Built-in Visuals
- Multi VGA Output options: D-Sub, DVI-D, HDMI and DisplayPort
- Combo Cooler Option (C.C.O.)
- 7.1 CH HD Audio with Content Protection (Realtek ALC898 Audio Codec), Supports THX TruStudio™
- Supports ASRock XFast RAM, XFast LAN, XFast USB, OMG, Internet Flash, UEFI System Browser
- Supports Intel® Smart Connect, Intel® Rapid Start, Lucid Virtu Universal MVP
- Free Bundle : 1 x Front USB 3.0 Panel, 1 x Rear USB 3.0 Bracket, CyberLink MediaEspresso 6.5 Trial, ASRock MAGIX Multimedia Suite
This board looks like it’s got all the essentials, and quite a few extras as well. Without further ado, let’s jump into first looks.
–~~~~~~~~~~~~–
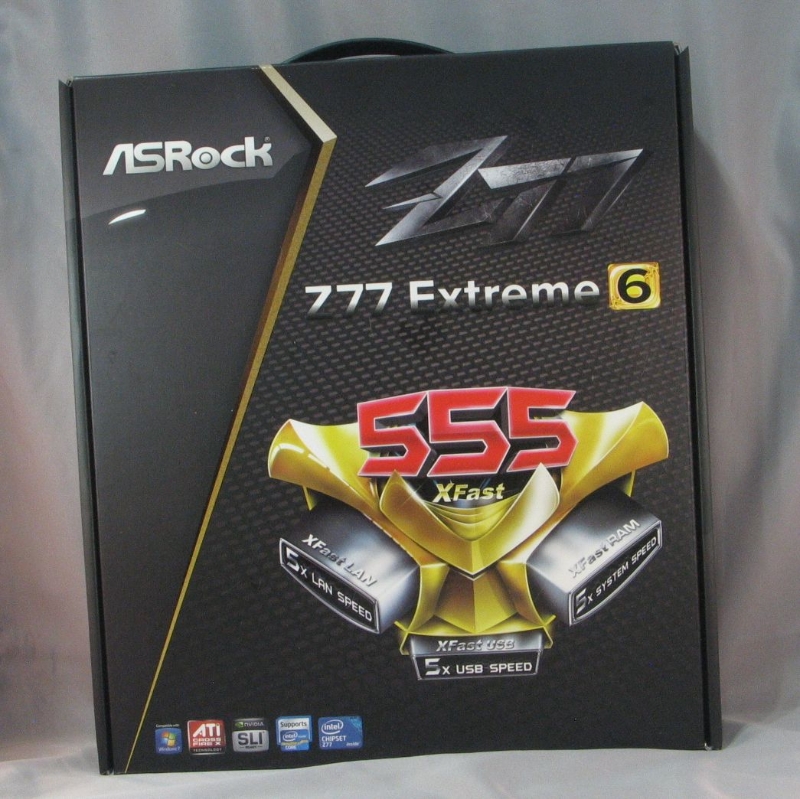
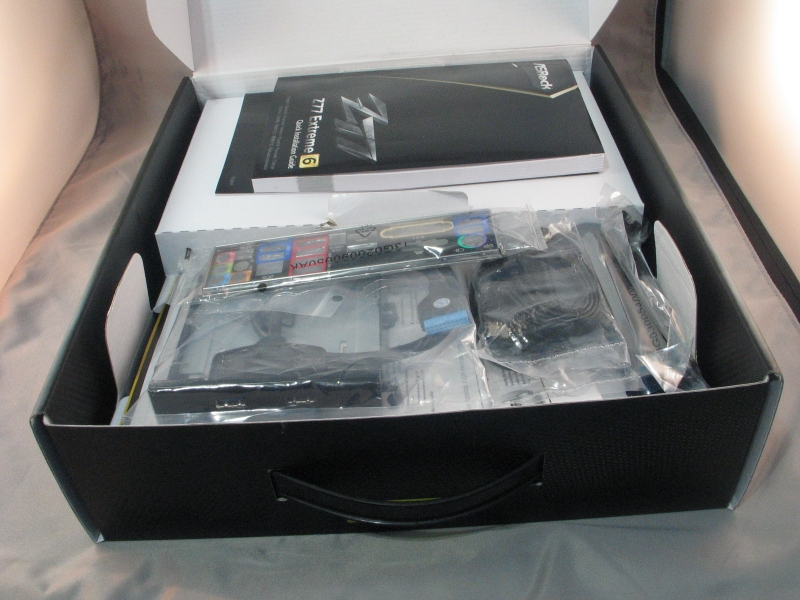
Packaging & A Closer Look
 |
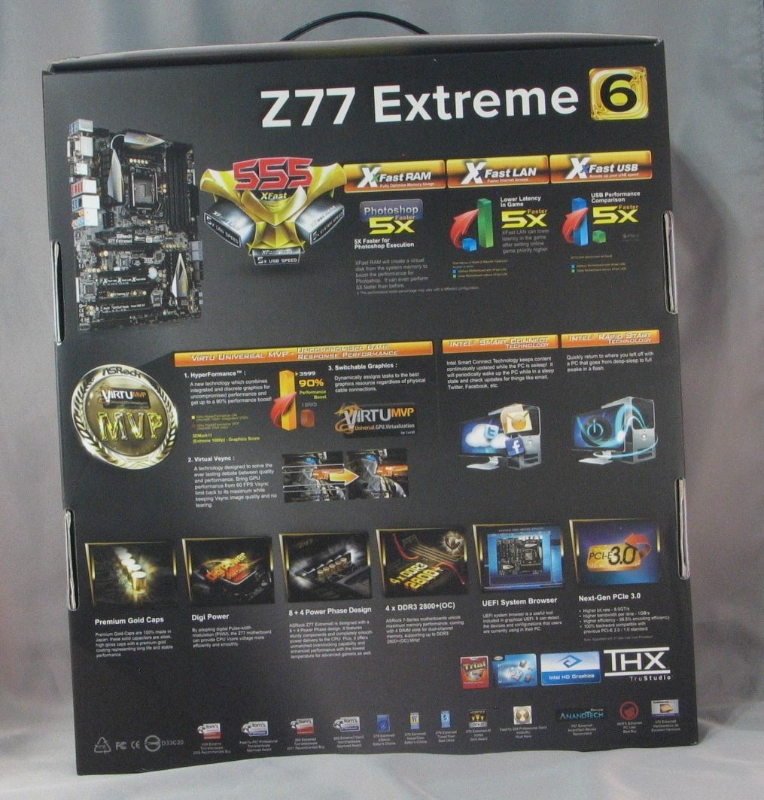 |
| Box front | Box rear |
 |
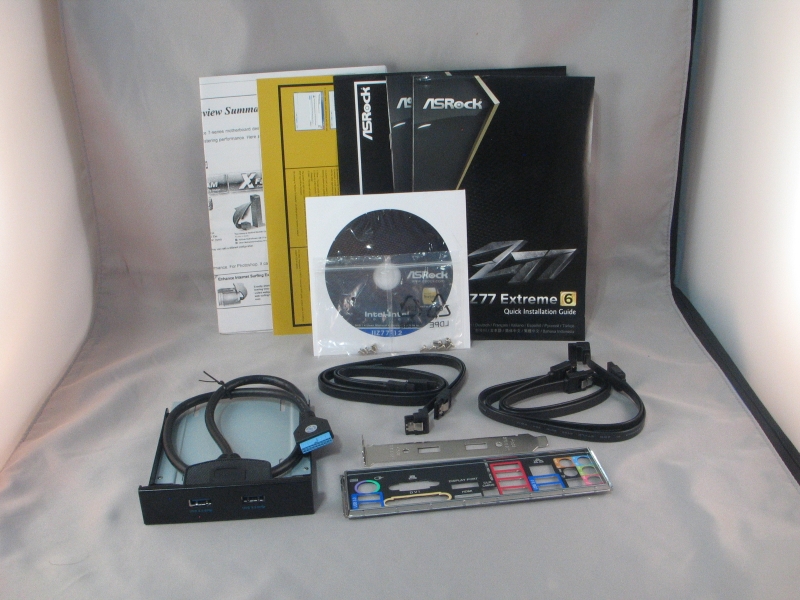 |
| Box open | Accessories |
Fairly standard packaging here. Aside from the standard manual, SATA cables, driver disc and IO backplate, this board comes with a USB3 port pair that runs off the header, and can be installed either in a 3.5″ drive bay or a expansion card slot. The ports are secured in either place with a couple of Phillips head screws, so changing it over is easy.
 |
| Board overview |
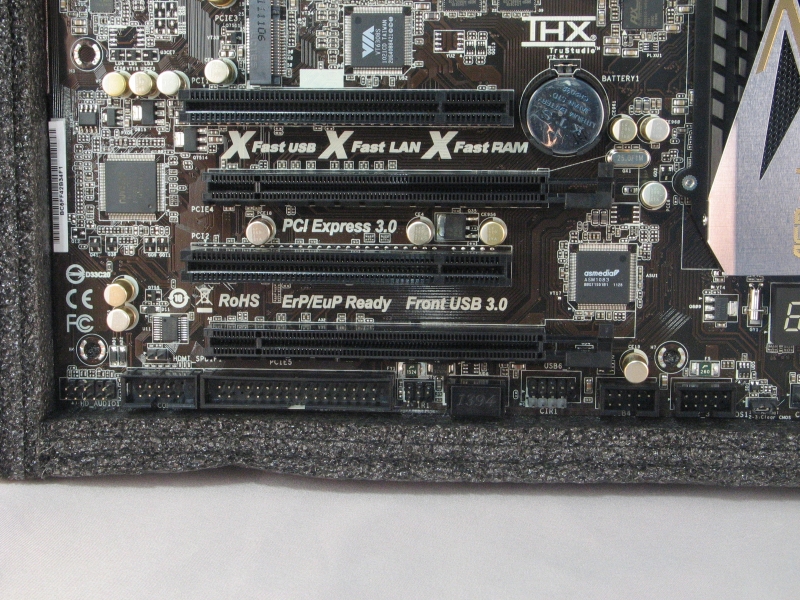
The overall layout is fairly clean, with everything done up in a tasteful black, silver and gold color scheme. The board has four PCIe x16 slots, one wired for x16, one wired for x8, one wired for x4. If you’re planning on running a SLI or Crossfire rig, be aware that the x16 slot will downshift to x8 when a second graphics card is present in the x8 slot. Also present are two legacy PCI-X slots, one PCIe x1 slot, and one mini-PCIe slot. The 4-pin Molex plug above the top slot has to be plugged in to the power supply when two graphics cards are present, or it won’t boot.
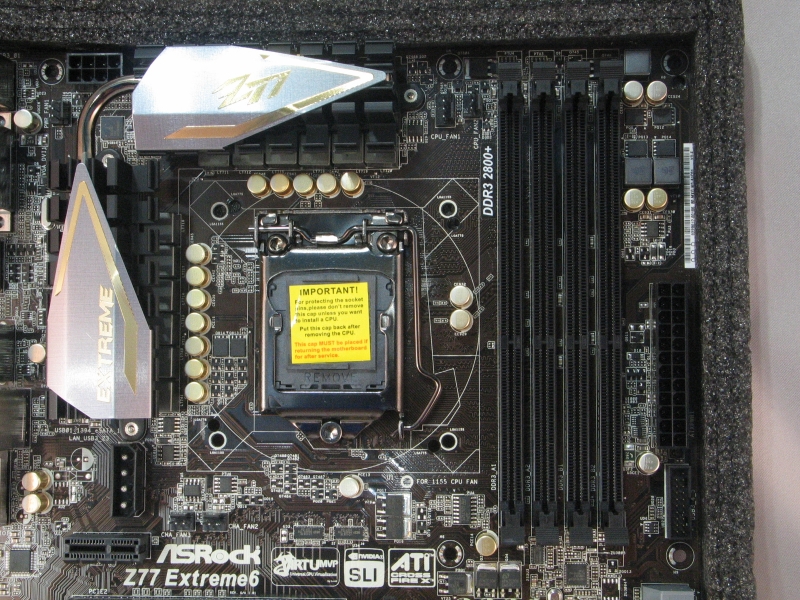 |
| CPU and RAM socket detail |
As with most LGA 1155 boards, clearance around the CPU socket is good. The ram sockets are rather close, so if you have an especially large cooler, you might have to be careful with vertical clearances. Above the socket itself, we see headers for two CPU fans–a helpful addition in these days of large, dual-fan CPU coolers. The second and third chassis fan headers are below the CPU socket, near the PCIe x1 slot. In an unusual fit of good sense, ASRock has placed the USB 3.0 header high on the front edge of the board, so your header cable doesn’t have to stretch as far.
 |
 |
| SATA port detail | Front panel header detail |
The SATA port area is remarkably uncluttered, with just power and reset buttons sharing space with the SATA ports on the front edge. The front panel header pins are lined up along the bottom, along with the clear CMOS jumper and one of the chassis fan headers. As far as front panel headers go, we have three USB 2.0 headers, a Firewire 400/IEEE 1394 header, an IrDA infrared header, a floppy drive header driven by an add-in chip, a serial port header, and the HD Audio header in the back.
One gripe I have with this arrangement: the HD audio header pins are in the very back bottom corner of the board, which makes things awkward when the front panel jacks are usually at the top front corner of the case.
 |
 |
| CPU and IO panel detail | IO panel |
In another bout of uncommonly good sense, ASRock has put the 8-pin EPS power plug up on the top edge of the board, where it’s a simple matter to tuck the rest of the cable back behind the motherboard tray. If your case mounts the power supply at the bottom, be sure the EPS power cable is long enough to reach, or you may have to do some awkward/ugly routing. The power supply fan header, if you have need of one, is up here as well.
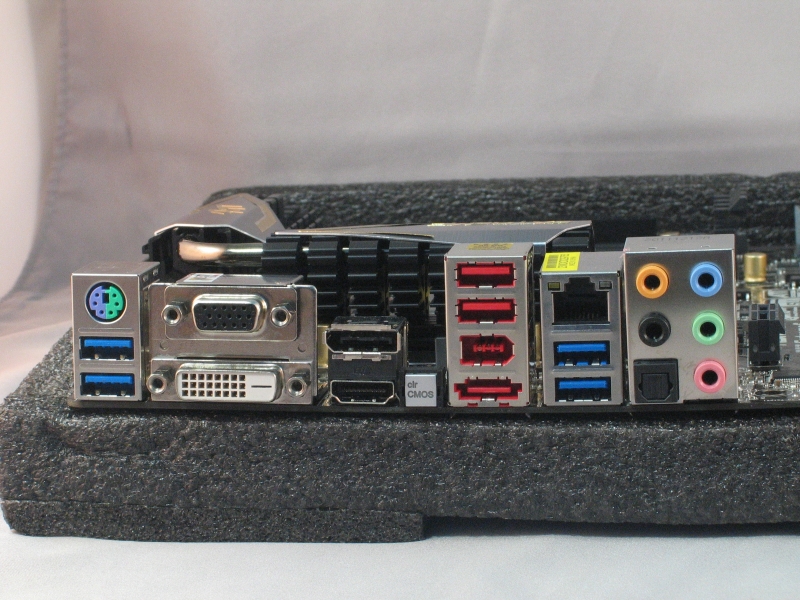
For the rear IO panel, we have an interesting port layout. From the top left, we have a PS/2 port, two USB 3.0 ports driven by the Z77 chipset, VGA out, DVI out, DisplayPort, HDMI, a clear CMOS button, two USB 2.0 ports, a Firewire 400/IEEE 1394 port, a eSATA port, 1000 Mbit Ethernet, two more USB 3.0 ports, and the audio outputs.
–~~~~~~~~~~~~–
Benchmarking
Test System:
- CPU: Intel Core i5-2300
- Motherboard: ASRock Z77 Extreme6
- RAM: Super Talent Extreme Performance DDR3 RAM 9-9-9-28@1866MT/sec
- Video card: Sapphire HD 6970 2GB GDDR5 Dual Fan
- System drive: Crucial RealSSD C300 256GB
- Data drive: Western Digital Caviar Green 500GB
- Power supply: Corsair HX750W
- Chassis: Silverstone Fortress FT-02
- OS: Windows 7 Ultimate Service Pack 1
- Graphics Drivers: Catalyst 12.4
Aida64
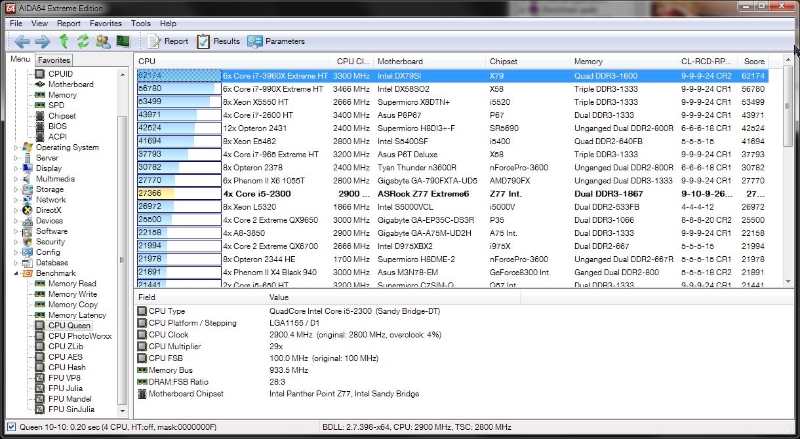 |
| CPU Queen – speed chess for your CPU |
This test is all about the CPU, testing branch prediction ability and misprediction penalties. All things being equal, the shorter pipeline usually wins here. As you might expect, our test system did reasonably well in this test, though it was ultimately beat out by CPUs with more cores, real or virtual, to devote to the task.
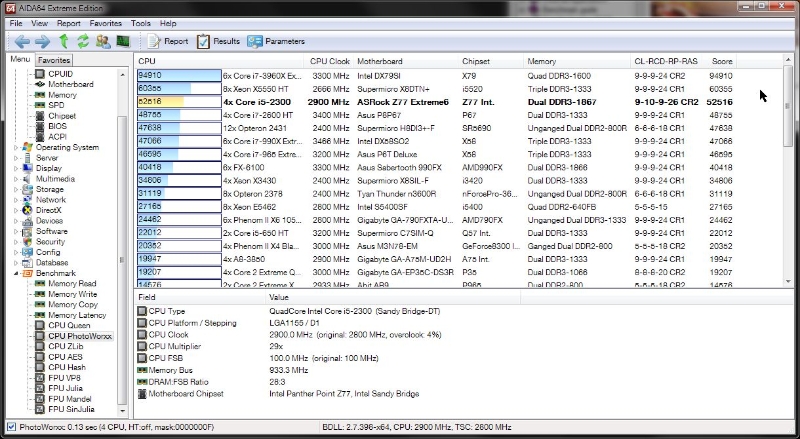 |
| CPU PhotoWorxx – brute force image manipulation, as fast as your CPU and RAM can deliver |
This benchmark is extremely bound by simultaneous memory transactions, so systems with triple-channel or quad-channel memory configurations will almost always do better, all other things being equal. Here our test system did quite well, coming in just two spots from the top.
 |
| CPU ZLib – basic data squeezing, nothing fancy |
This benchmark tests both the CPU and RAM by the simple expedient of running data through the ZLib compression library. This test doesn’t use anything past the basic x86 instruction set, so it’s a measure of pure brute-force number crunching capability. Here things lagged behind a bit, again due to the lack of more cores to throw at the problem.
 |
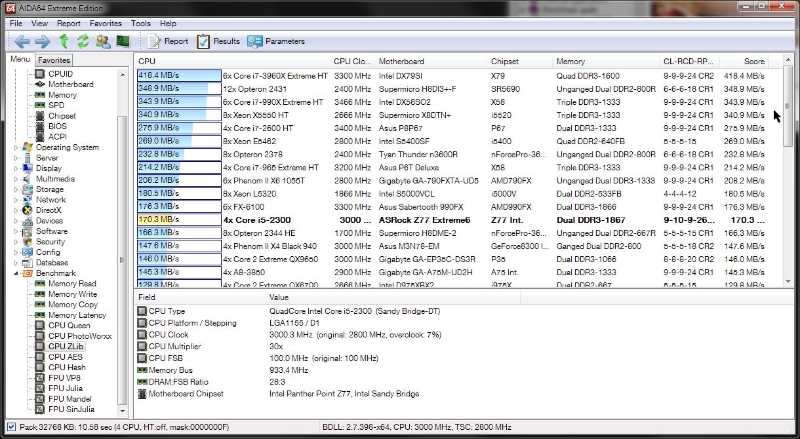
| CPU AES – encryption |
AES encryption is used in many places you’d expect, such as SSL/TLS connections, and the TrueCrypt, BitLocker, and FileVault disk encryption systems. It’s also used in some less obvious places, like in the 7Zip, RAR and WinZip compression tools. Here’s where the Z77 chipset starts to show its worth; our test system outperformed a higher clocked and hyperthreaded i7-2600.
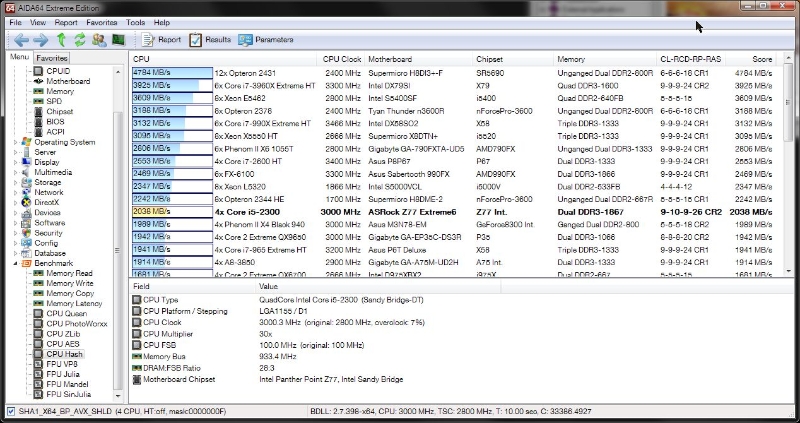 |
| CPU Hash – data digests |
SHA1 is the popular complement to AES. Where encryption provides privacy for your data, hashing provides tamper-resistance, in the form of a fingerprint that will change if even one byte of the original data changes. Unlike with AES, the Sandy Bridge CPUs don’t have special hardware acceleration for SHA1. As you might expect, more cores equals faster hashing.
 |
| FPU VP8 – video on the go |
Video encoding is one of the few things that a lot of people do that really pushes modern CPUs. This test forgoes H.264, which often has lots of special hardware acceleration, in favor of VP8. If you want an example of VP8 in action, go watch any YouTube video. For VP8 encoding, as with many things, the more cores the better.
 |
 |
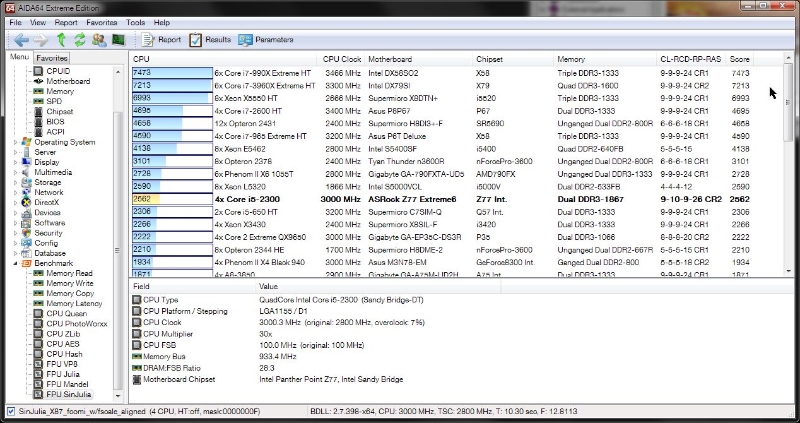 |
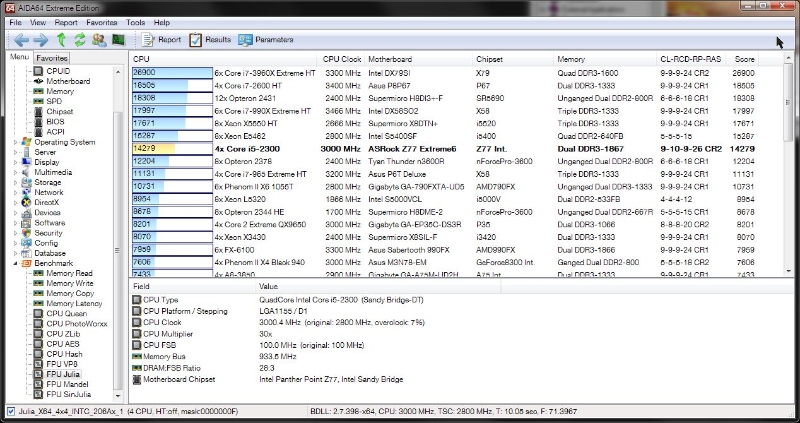
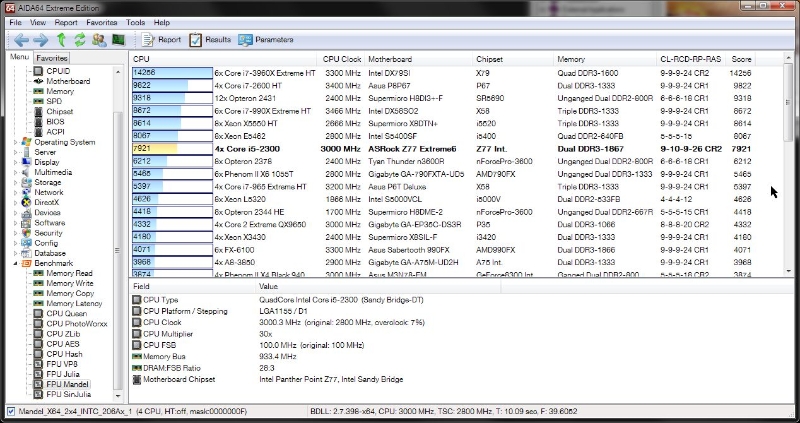
| FPU Julia | FPU Mandel | FPU SinJulia |
The FPU Julia, FPU Mandel, and FPU SinJulia benchmarks are all variations on a single theme: use fractals to test the raw floating-point capacity of your CPU. These tests measure performance in single-precision (32-bit), double precision (64-bit), and extended precision (80-bit) calculations. What’s the moral of this story? If you want to render fractals fast, get more cores.
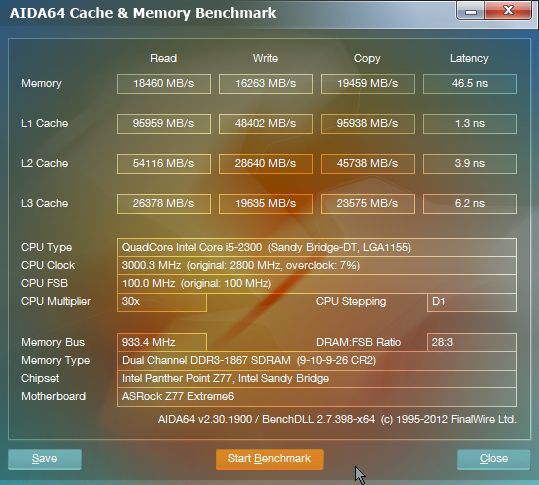 |
| Cache & Memory |
As you can see here, the Z77 chipset is not bottlenecking the memory at all. Memory read speeds, at 18,460MB/sec, are right on par with the memory clock of 1800 MT/sec, and memory copy is actually a bit faster at 19,459 MB/sec. Memory write lags a bit behind clock, at 16,263MB/sec, but this is neither unusual nor unexpected. The latency, at 46.5 ns, is excellent for RAM at this clock speed.
Performance Test
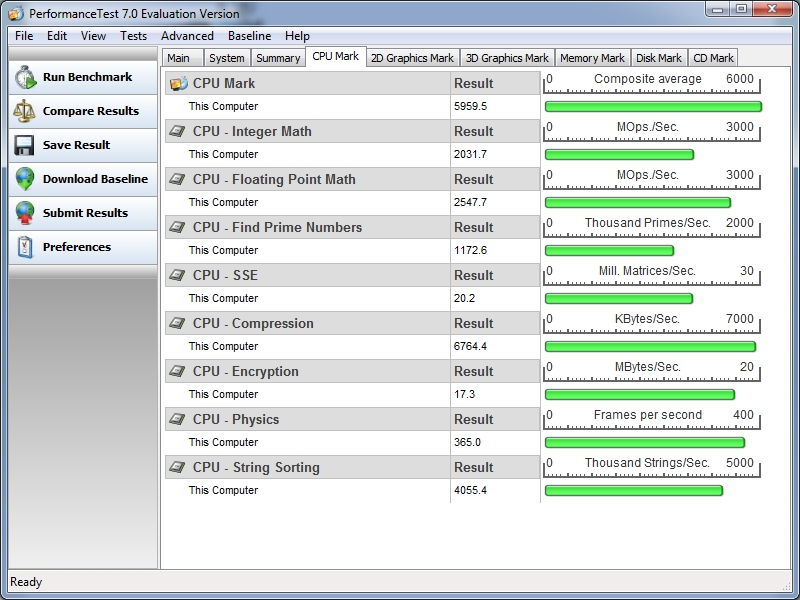 |
 |
| CPU Mark – P67 | CPU Mark – Z77 |
Here the results are entirely CPU-dependent; the motherboard’s only task is to get out of the way. It does so here with aplomb, posting results nearly identical to what we saw with the MSI P67A-GD80. If anything, the results are marginally better with the Z77 chipset.
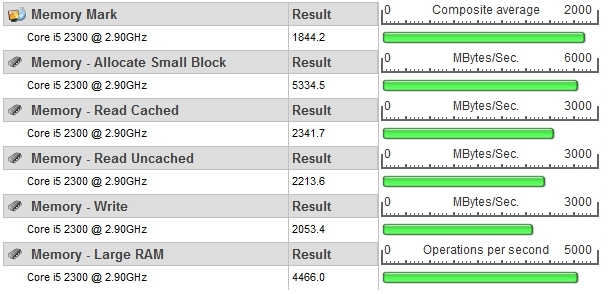 |
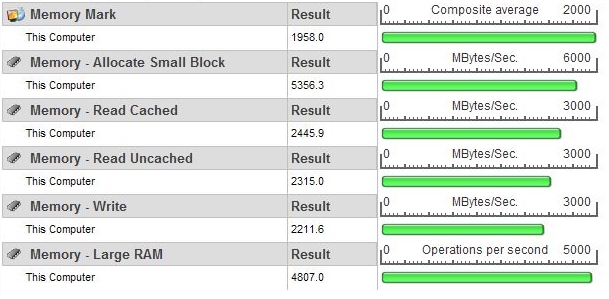 |
| Memory Mark – P67 | Memory Mark – Z77 |
Same story here; incremental improvements over the P67.
 |
 |
| Disk Mark – P67 | Disk Mark – Z77 |
Here again, minor improvements over the P67. While these tests clearly illustrate that most of the onus is on the CPU itself to perform, it’s good to see that the Z77 board won’t hold you back any if you decide to get one now and grab a 3rd gen Core i5/i7 CPU later on.
Sandra
 |
 |
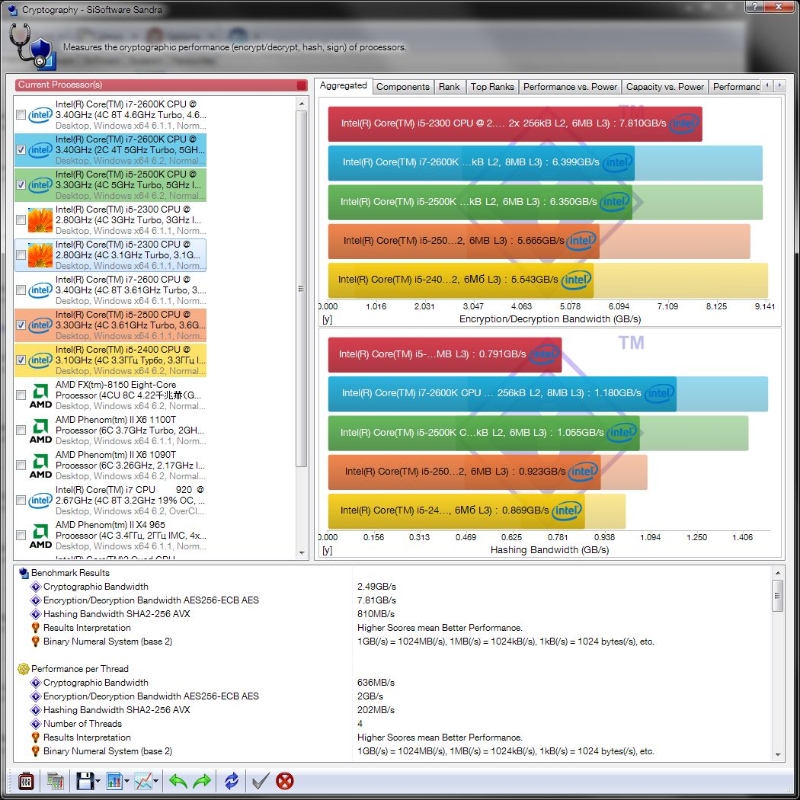 |
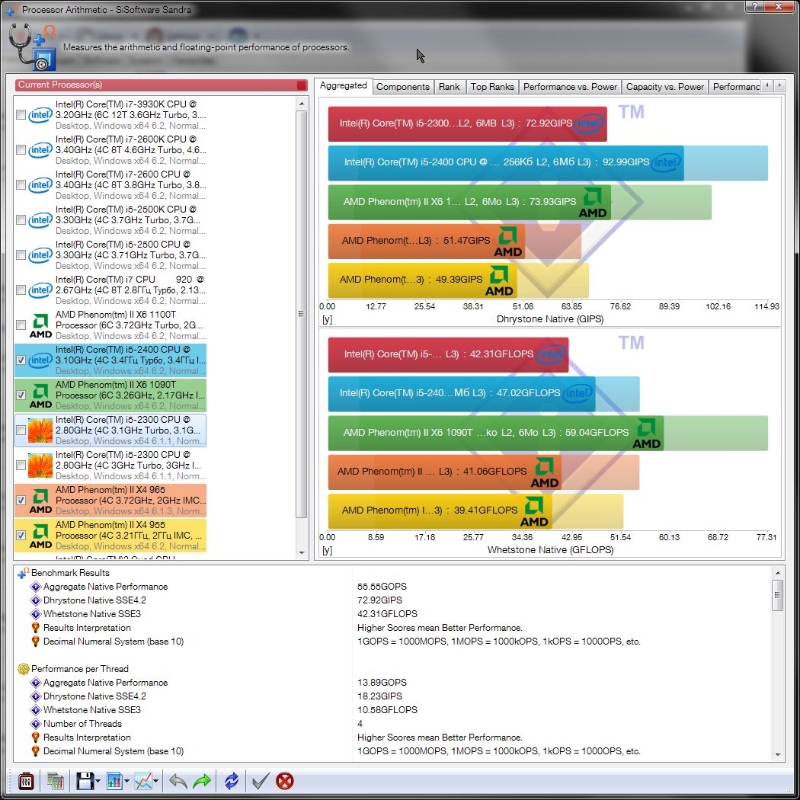
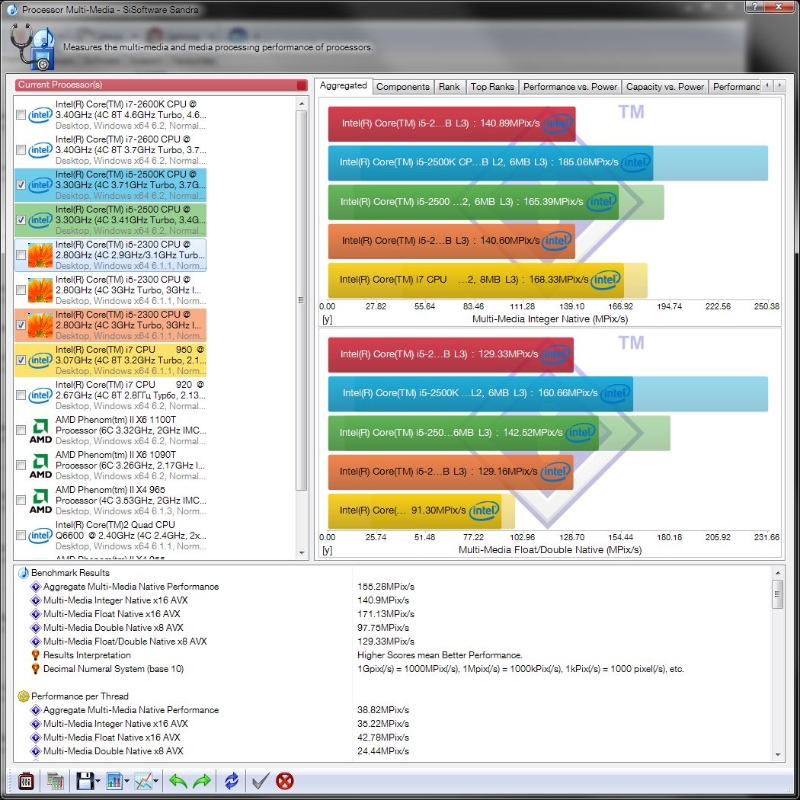
| CPU Arithmetic | CPU Multimedia | CPU Cryptography |
Here the results are mostly what you’d expect for a mid-range i5 processor. The one outlier here is the cryptography test, where our test system managed a throughput of 7.8 GB/sec. Given that the same CPU on a P67 board only managed 5.6 GB/sec on the same test, it’s clear that the Z77 is helping out here.
PCMark 7
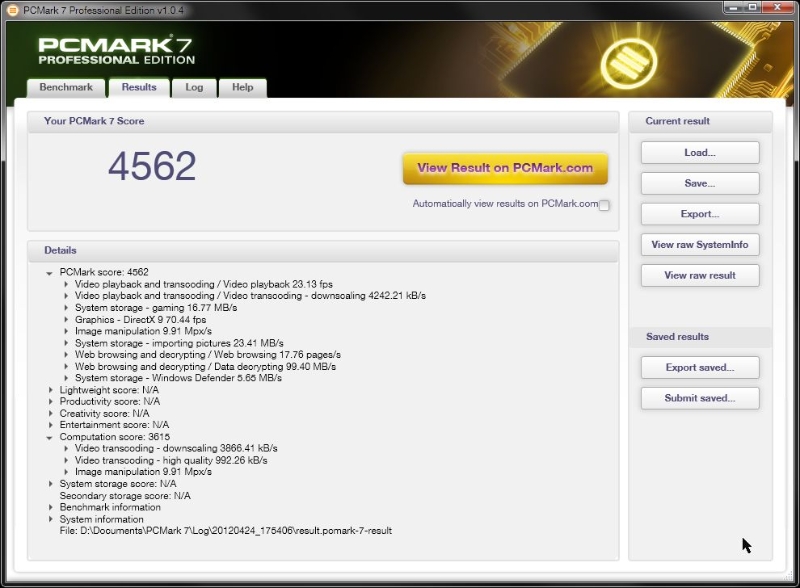 |
The basic score of 4562 doesn’t tell us much, but thankfully PCMark 7 gives us a bit more detail to provide context. In the on-the-fly encoding and playback test, our system managed a steady 23fps, which is right on the money for most TV and movie content. In the encode and downscale test, it managed a throughput of 4242 kB/sec, which is enough to manage multiple HD streams—provided, of course, that your storage can keep up with the demand.
–~~~~~~~~~~~~–
Virtu MVP
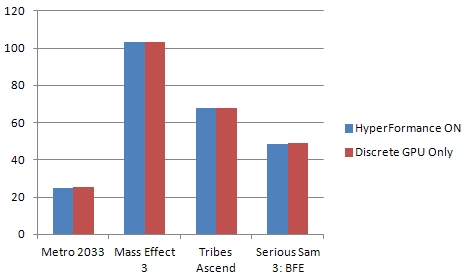 |
In theory, the Virtu MVP software included on the driver disc is supposed to help boost graphics performance by pulling in the integrated graphics cores on your CPU to share the load. In practice, the difference is so miniscule as to be outweighed by the overhead of running it on top of whatever program you’re using. As the graph above shows, we saw no improvement in frame rates with any of the games tested, and in a couple of cases actually saw minor drops in performance due to the overhead of the Virtu drivers. Thankfully, these drivers are entirely optional, and will gracefully remove themselves after a simple uninstall and reboot.
Thoughts & Conclusion
From the word go, the installation process of this board was very smooth. There were no weird issues with cable placement, nor did I have to do any special voodoo to get the RAM working. Clearances were good all around, especially around the CPU socket. The included USB 3.0 bracket can change from a 3.5″ front bay mount to a rear expansion slot mount with just a couple of screws, and provides two ports with plenty of clearance around them in either configuration. Also helpful during the setup process was the debug LCD port, which displays POST status codes when the system is powered on. This helped me to spot and fix an improperly seated RAM module with barely a pause.
The UEFI BIOS, while technically a graphical affair, bears a strong resemblance to older-style BIOS menus of the past. It can be navigated entirely with the keyboard, and has the usual raft of overclocking options, including the ability to save your current clock and voltage settings to one of three onboard profiles. On the storage front, this system lets you specify which of your SATA devices are solid state and which are hard drives; this setting is respected in Windows 7 with regard to things like SuperFetch and background defragmenting. Other small touches, like the ability to automatically turn off the power LED during evening hours, show that ASRock put a lot of thought and care into this board.
A few gripes here: the number of available USB 2.0 ports is somewhat low; one pair on the back I/O panel plus two headers for a total of six ports available. The USB 3.0 ports are similarly numbered, though four of them are present on the back I/O panel. The floppy connector, while nice for some, is largely superfluous in this day and age; I would have preferred the space go to more generally useful connectors. Similarly, the inclusion of all four popular types of video connectors crowds out extra USB or firewire ports. The biggest flaw is the lack of a second gigabit Ethernet adapter. While not strictly required, such a thing is very useful if you want to do high-speed file transfers between two machines without involving a router.
Overall, this board is a rock-solid performer, and will provide a solid foundation for a high-performance gaming PC.
 |
Pros:
- Clean layout
- Feature-packed BIOS
- Excellent performance
- Legacy ports provide extended backwards compatibility
Cons:
- Only one front USB 3.0 header
- Overall number of USB ports is low
- No second gigabit Ethernet adapter

[…] ASRock Z77 Extreme6 Motherboard @TechwareLabs ASRock Z77E-ITX Motherboard @ Hardware Secrets ASUS Sabertooth X79 Motherboard @ Technic3D MSI […]
[…] ASRock Z77 Extreme6 Motherboard @ TechwareLabs […]
[…] MotherboardASRock Z77 Extreme6 Motherboard @ TechwareLabs […]
[…] ASRock Z77 Extreme6 Motherboard @ TechwareLabs […]
[…] ASRock Z77 Extreme6 Motherboard @ TechwareLabs […]
[…] ASRock Z77 Extreme6 Motherboard @ TechwareLabs […]
[…] and fix an improperly seated RAM module with barely a pause." You can read the full review here. "Other girl's luxuries are my necessities, so buddy, […]