Introduction
For several years now, SilverStone has been one of the top names in computer cases, standing alongside companies like Lian Li and Antec. From the introduction of the Temjin series, it’s been clear that SilverStone’s main target has been the PC enthusiast who wants a solid, refined chassis. Their Fortress series, begun last year with the Fortress FT-01, took several of the lessons learnt with the Temjin series and applied it to a new mid-tower form factor. Today we’ll be taking a look at the Fortress FT-02, a case that combines the unibody construction of the Temjin and Fortress series chassis with several cooling tricks first developed with the Raven series.

SilverStone’s Take
First, let’s see what SilverStone has to say about this case:
Combining two of SilverStone’s most distinctive computer chassis breakthroughs – the unibody construction of the Temjin TJ07, introduced in 2005, and the 90-degrees rotated motherboard mount of the RAVEN RV01 from 2008 – the Fortress FT02 advances both chassis construction and thermodynamics in a dynamic, streamlined design. With the Fortress FT02, SilverStone engineers have combined the rigidity of unibody construction with the unparalleled cooling layout of the RAVEN chassis, adding a hot-swappable hard drive cage and an acoustically padded interior for maximum versatility. The result is increased structural strength, increased storage capacity, and whisper-quiet operation. Available in black and silver colors, its elegant outer shell is perfectly accentuated by the U-shaped unibody aluminum frame that not only provides unique styling, but also functional purpose. The bottom gap from the frame to the main body actually serves as the main air intake area for its three massive 180mm fans, making it even suitable for use on carpeted surfaces. For professionals and enthusiasts looking to build a silent workstation or gaming machine with maximum performance, there is no better than the SilverStone Fortress FT02.
Clearly, this case is meant for enthusiast users who put heavy demands on their hardware. We’ll see if it holds up.
Features and Specifications
Here’s a quick rundown of what the FT-02 has to offer:
- Revolutionary 90 degree motherboard mounting from RAVEN RV01
- Innovative 4.5mm aluminum unibody frame from Temjin TJ07
- Three 180mm fans for unprecedented positive pressure and stack effect cooling
- Supports liquid cooling radiator mounting
- Motherboard back plate opening behind CPU area for quick cooler assembly
- Supports 11” wide ATX motherboard
- Foam padded interior for advanced noise absorption
| Model No. | SST-FT02B (black) | |
| SST-FT02S (silver) | ||
| SST-FT02B-W (black + window) | ||
| SST-FT02S-W (silver + window) | ||
| Material | 4.5mm aluminum unibody frame, 0.8mm steel body | |
| Motherboard | SSI CEB, ATX (maximum 12” x 11”), Micro ATX | |
| Multimedia | — | |
| Drive Bay | External | 5.25″ x 5 |
| — | ||
| Internal | 3.5″ x 5 , 2.5” x1 | |
| Cooling System | Front | — |
| Rear | — | |
| Side | — | |
| Top | 1 x 120mm exhaust, 1200rpm, 19dBA | |
| Bottom | 3 x 180mm intake fan 700/1000rpm, 18/27dBA | |
| Internal | — | |
| Expansion Slot | 7 | |
| Front I/O Port | USB 2.0 x 2
Audio x 1 MIC x 1 |
|
| Power Supply | 1 x Optional standard PS2 (ATX) | |
| Expansion Card | Support 12” or 12.2” (with fan grille removed) | |
| Net Weight | 15kg | |
| Dimension | 212mm (W) x 497mm (H) x 616mm (D) | |
| Extra | — | |
Packaging
Now that we’ve got the spec sheets out of the way, let’s have a look at the case itself. First, the packaging—because sometimes you can judge a book by its cover.
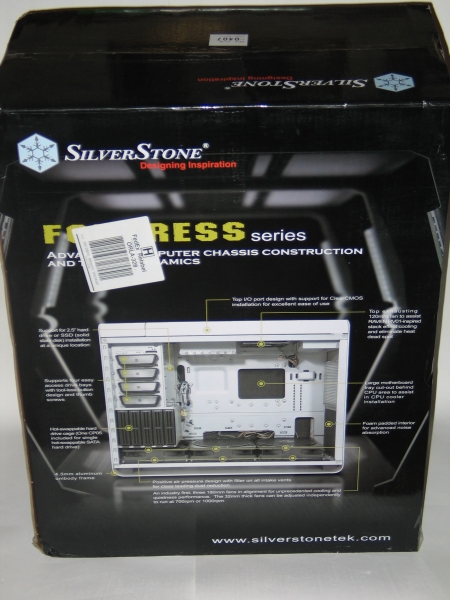 |
As with the FT-01, SilverStone has decorated the packaging with a mock-up of an underground bunker, in keeping with the Fortress name. Front and center, we see a picture of the case opened up, with all the relevant features highlighted. Simple, effective, and to the point. |
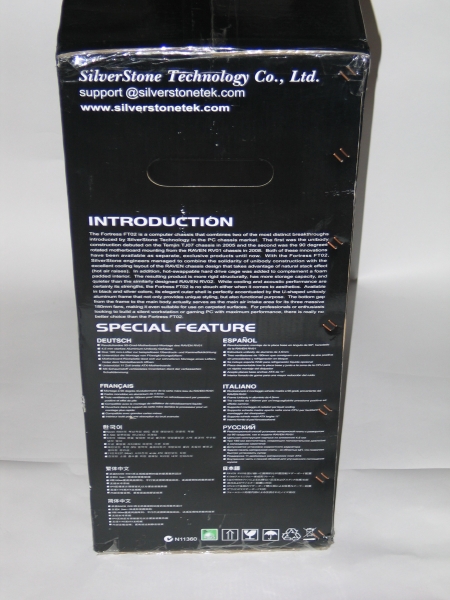 |
On the side, a little blurb on what inspired the design of this case, which you can see on the first page, under SilverStone’s Take. Below that, translations of the feature highlights into German, Spanish, French, Italian, Korean, Russian, Chinese, and Japanese are included, indicating that this is a case meant for the worldwide market. |
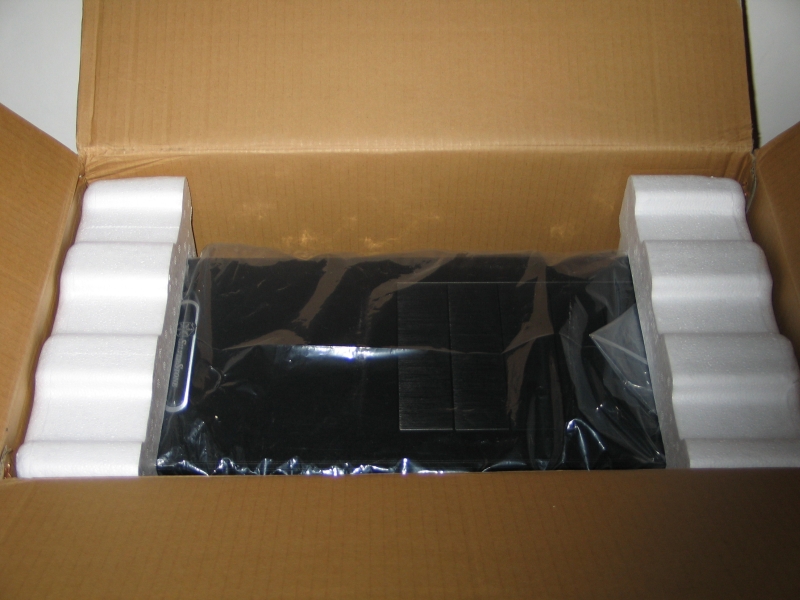 |
Opening it up, we see the case itself wrapped in a plastic bag and bookended by a pair of foam caps—standard fare, and plenty to keep the case safe in transit. For once the UPS guys didn’t play kickball with the box, so everything was in pristine condition. |
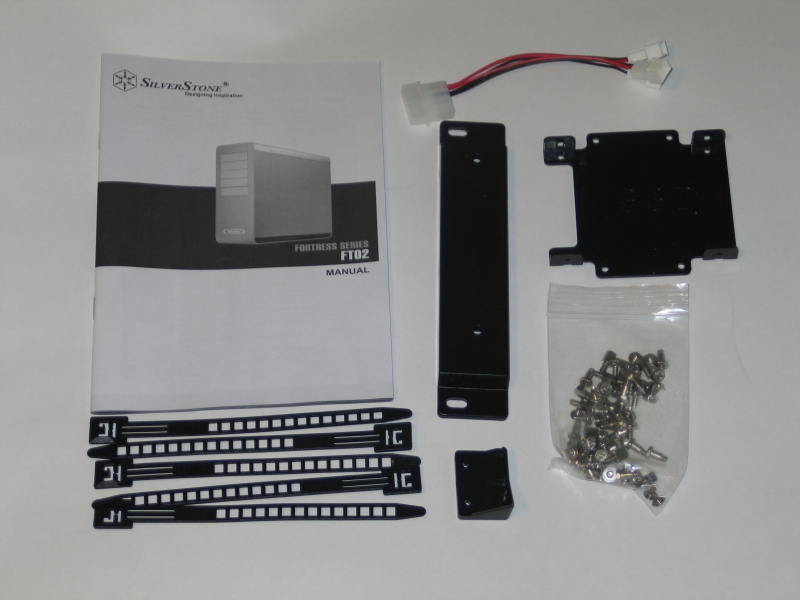 |
Here we see the accessories included in the small cardboard box tucked into one of the styrofoam caps holding the case in place. Aside from the expected manual (a fairly thorough affair printed on high-quality paper) and bag-o-screws, we see several reusable cable ties, an adapter for hooking up three fans to a Molex plug, and a few odd bits of plastic. The one labeled SSD, as you might guess, is for mounting a single SSD drive to the back of the motherboard tray. The long, rectangular piece is one of a pair, used for mounting a water cooling radiator to the bottom of the case, in place of the rear two intake fans. The other odd little bit is actually a PSU holding bracket, used in tandem with a Velcro strap (not pictured, found floating around loose inside the case) to help hold the PSU in place in its unusual location.
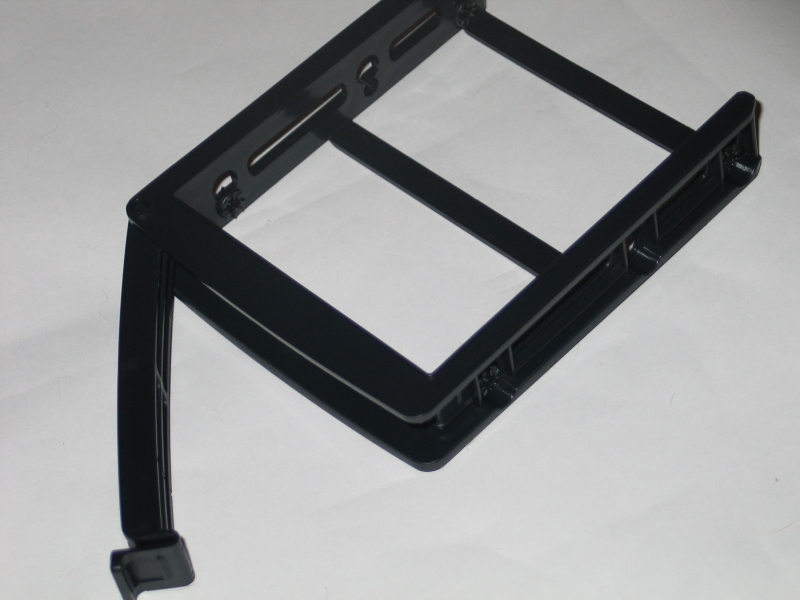
One accessory notable by its absence is the hot-swap bracket for the 3.5″ hard drive cage, which would allow one to quickly mount and dismount drives simply by sliding the caddy into and out of the slot. While this is hardly a usual thing to include with a case, the fact that the packaging and manual go out of their way to mention it make the absence somewhat notable. |
A Closer Look – Exterior
Now that we’ve torn away the wrapping like a kid on Christmas morning, let’s get to the main event: the case itself.
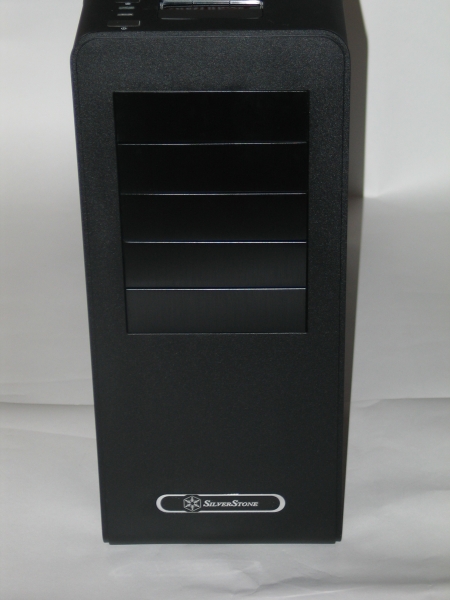 |
After getting things clear of the packaging, we first have a look at the front of the case. Simple is the watchword here, with nothing marring the matte black surface other than the five 5.25″ drive bay covers and a small SilverStone logo near the bottom |
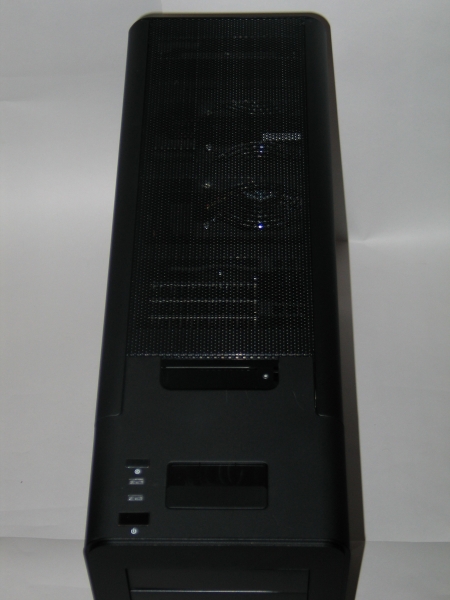 |
Moving to the top of the case, we see that much of the interesting stuff is concealed under a perforated mesh grille that can be popped off. Near the front, we see the power button, reset button, power and HDD activity LEDs, and a sliding door that conceals the front I/O panel. On this panel are two USB 2.0 ports and ports for headphones and microphone. An e-SATA port would have been nice, but all the essentials are covered here. |
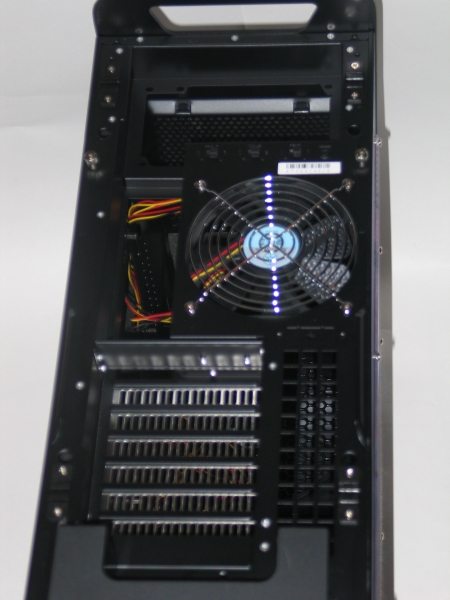 |
Removing the top grille, we see one of the first major differences about this case. Yes, those are the mounting points for the motherboard and power supply there. In this case, as with the Raven RV-01 that preceded it, the FT-02 mounts the motherboard sideways, so that the rear I/O panel and expansion slots are on the top side of the case. The hole near the back is not a handgrip, as you might suspect, but rather a pass-through for the various cables one would normally plug in. With the mesh top on, this lets the case retain its sleek look while affording ease of hook up—a major plus for frequent LAN party-goers. Next to the I/O plate hole is a 120mm fan, which serves as the FT-02’s sole exhaust. Next to the fan are a trio of switches that control the speed of the three intake fans below. |
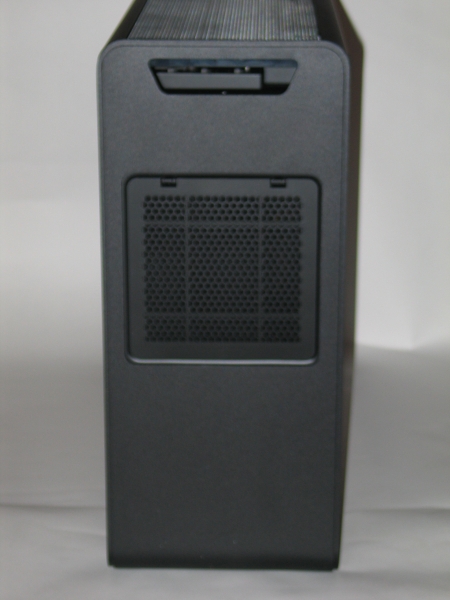 |
Moving to the back of the case, one can see an intake filter for the power supply. Since many high-performance PSU’s get their needed cooling via a bottom-mounted 120mm fan, this allows the PSU to draw cold air from the outside, rather than from the already-heated case interior. |
 |
Not much to notice here, other than the wide rubber feet at front and back that keep the case from sliding about. |
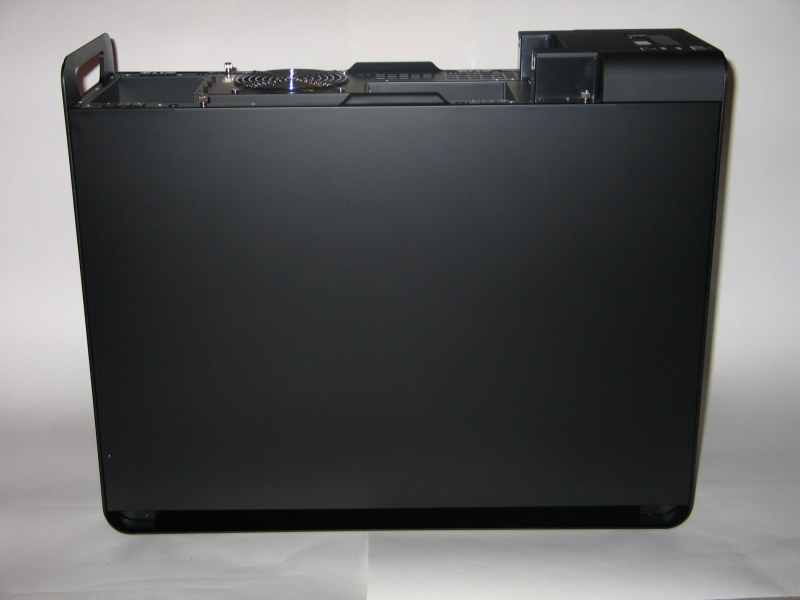 |
Next we move to the left side of the case, where we find—nothing! Yes, one gets at the guts of this case from the right side, which may run counter to the expectations of some. Note the two thumbscrews at the top of the panel, which hold it in place. |
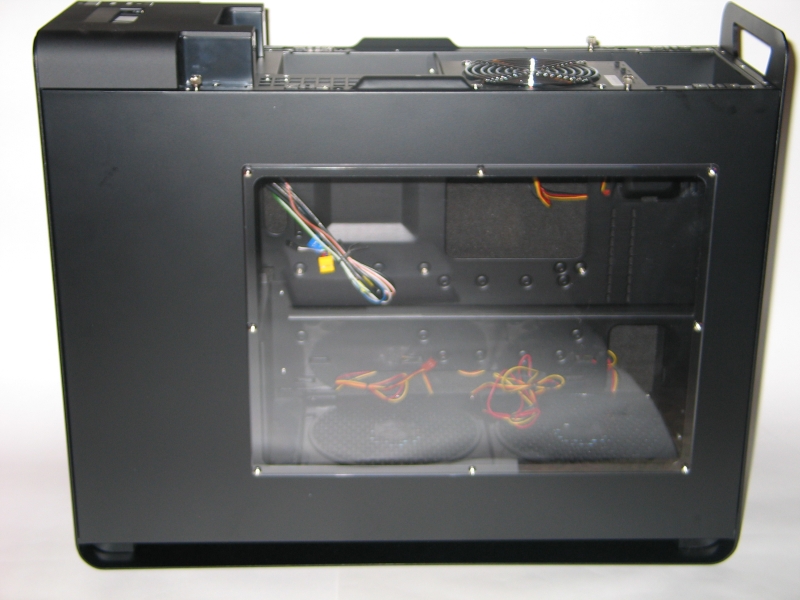 |
On the right side of the case, we see somewhat more of interest, including the window that lets one show off the interior. |
A Closer Look – Interior
So far so good; now let’s take a look inside.
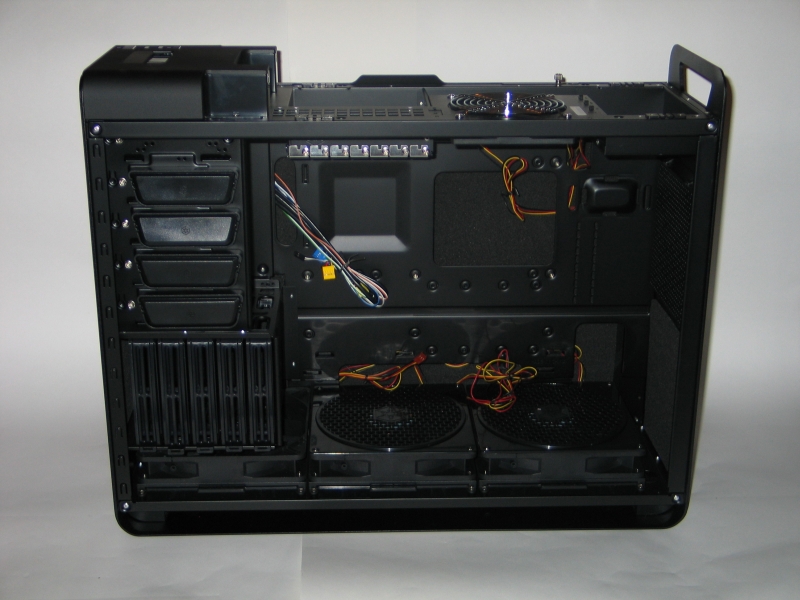 |
Taking the side panel off, we get our first look at the guts of this system, where all the really interesting bits are. Over near the front, we see the 5.25″ bays, with SilverStone’s tool-less push-lock mounting brackets on the bottom four. Below that, we see the hard drive cage, with caddies for five 3.5″ hard drives, mounted on their sides for better airflow from the intake fan just below them.
In the main chamber itself, we see the motherboard tray, which includes a large cutout near the CPU mounting area. This is quite nice for people who want to be able to change out the backplate on their CPU cooler without unmounting the motherboard. Just to the right of the motherboard is the PSU mounting area, where the aforementioned Velcro strap and plastic holder come into play to hold the PSU in place. |
 |
There are two major things to note here. One is that the spaces between the caddy rails are ventilated, which allows the intake fan to better do its job. Even so, the spacing still makes for restricted airflow when all five caddies are installed and in use, I would not recommend using more than three at once for best hard drive performance.
The other thing to note is that the area around the drive cage is surrounded in acoustic foam, which should help to muffle the clicks and whirrs of the hard drives while in use. |
 |
The caddies themselves are fairly well-designed. Four screws hold each drive in place, and the caddy slides straight into position, with the lever on the front locking it in place. |
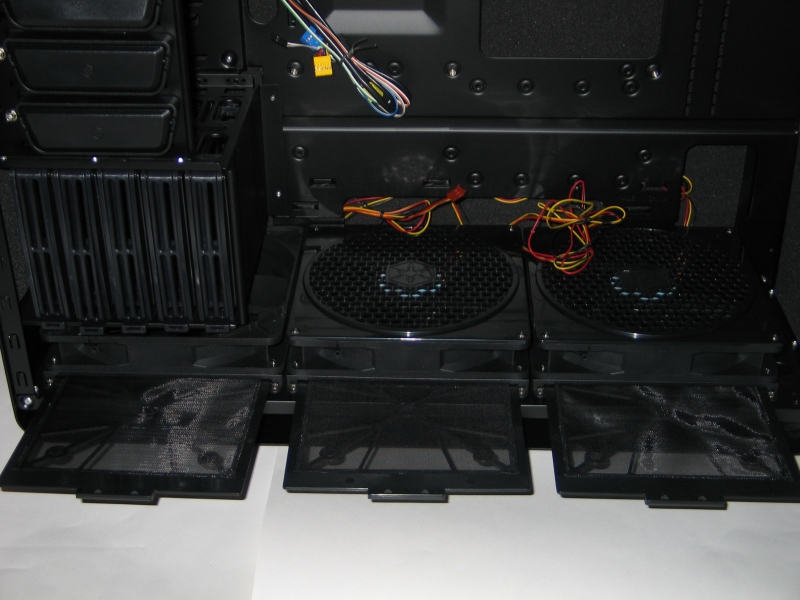 |
The three intake fans along the bottom deserve some special mention, as they have several noteworthy qualities. First, the fans themselves: 180mm in diameter, with removable dust filters for each one. The top side is covered in a honeycomb grille, which helps to prevent mishaps with dangling cables during use. Second, the position: they are positioned along the bottom, with a false bottom on the case to allow for good intake even on carpeted floors. Combined with the position of the motherboard and exhaust fan, this allows the airflow to be a straight line from bottom to top. |
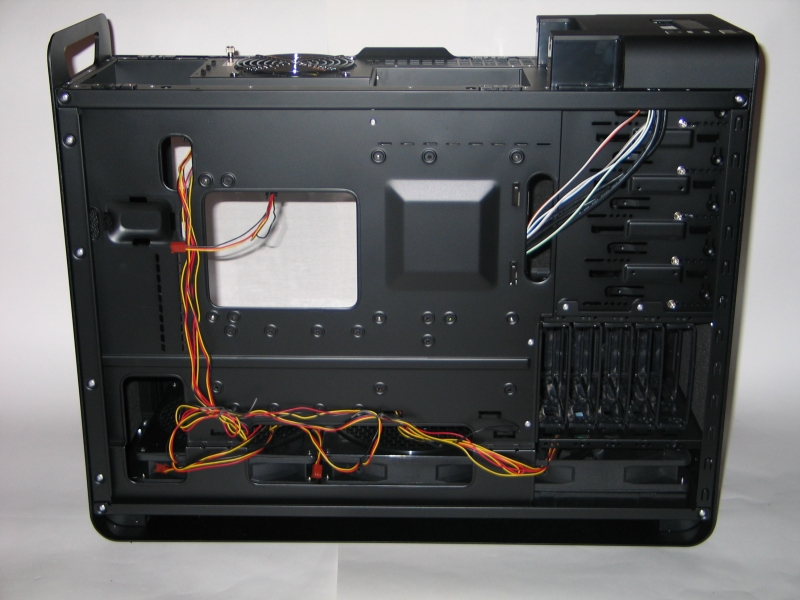 |
Flipping the case around, we have a look at the backside of the motherboard tray. First and most immediately apparent is the wiring for the intake fans. Although SilverStone were nice enough to tie it down with twist-ties, the tangle of bare wires is unsightly to say the least. Some mesh sleeving would have gone a long way towards cleaning things up.
Next up are the tiedown brackets and tray cutouts. Here SilverStone have done quite well, making sure that each cutout is accompanied by at least a pair of tiedown brackets for securing the cables that might run through it. The wires for the front panel also find their way to the motherboard through one of these cutouts, which makes it easy to tuck the unused cables out of sight behind the drive bays. |
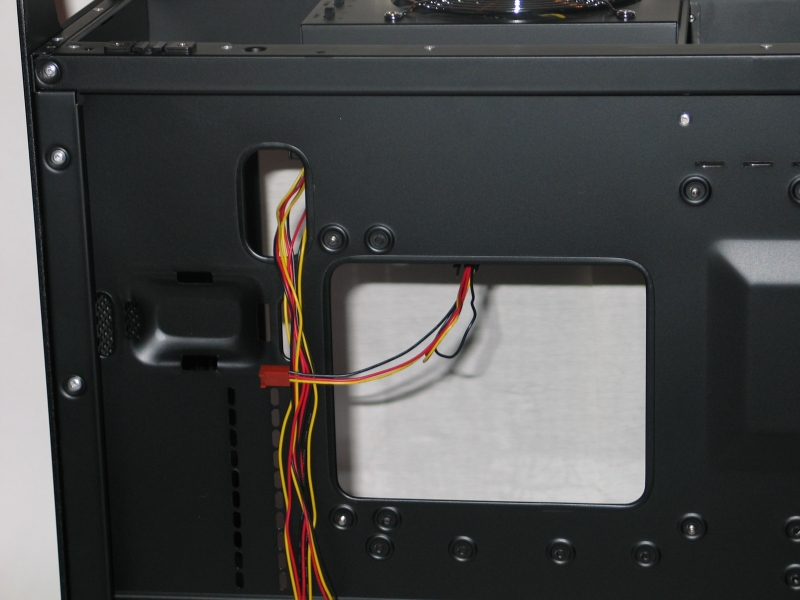 |
The area around the CPU cutout has a few interesting things to note. First is the strategically placed cutout near the corner of the motherboard, which is perfect for snaking in the EPS12V cable while keeping the rest out of sight. Next is the raised bump on the PSU mounting section, which has a couple of slits for feeding the Velcro securing strap through. The rows of vertical slits below it are for mounting the plastic PSU-corner-holder bracket with a pair of screws. |
Installation
Before we begin, a quick note about tools. Many people run into all kinds of difficulties getting their hardware into a case in one piece, and this can be avoided with the presence of a few simple tools:
- #1 Phillips head screwdriver, with a shaft at least 4″ long
- Needle-nose pliers with wire cutter
- Tweezers
- Anti-static wrist band
- Large syringe of thermal paste
- Paper towels
- Shallow bowl or empty egg-carton for loose screws
You can get much fancier with tool kits, of course, but this short list contains everything you need to get your system installed with a minimum of fuss.
Getting my system installed into this case had a few tricky moments to it, but thankfully all the odd bits were covered in the manual. Major kudos to whoever wrote that manual, it does a very good job of laying out the steps needed to go from empty chassis to installed system in a clear manner. Unlike many others of its ilk, this manual interweaves the translated text into each step. This helps to avoid the usual malaise: a pathetic little pamphlet bound together with five or six copies of itself in different languages, with cramped illustrations and text printed in Flyspeck Sans 4pt. If Lian Li and Antec take no inspiration from the chassis itself, they at least need to take a long look at the manual.
Getting the motherboard mounted was fairly uneventful. Once the proper standoffs had been screwed into the tray, I had only to pop the I/O backplate into the slot, ease the motherboard onto its standoffs, and go to work with a screwdriver. Note that the space between the edge of the motherboard and the PSU may be tight if your CPU cooler is large, so you’ll want to leave off installing the PSU until the last.
Getting the hard drives and optical drive installed was similarly uneventful. I chose to use the top slot for my DVD writer, which meant I had to use a quartet of case screws to secure it instead of the push-lock system. Here is where the long-shaft screwdriver came into play; the clearance between the mounting screw holes and the top case lip was rather narrow, and would have caused problems for a short screwdriver. Getting the hard drives in place was trivial, thanks to the caddies. Also of note was the low clearance behind the top slot; unavoidable due to the position of the expansion slots. Putting the drive there necessitated the use of right-angle plugs for power and data. If you don’t have such plugs, or have a longer drive, you’ll need to use one of the lower four bays.
Mounting the PSU was a bit trickier than usual, owing to its odd positioning. The best method seemed to be to feed both ends of the Velcro strap through the slots on the motherboard tray, and leave them hanging while I held the PSU up to the top bracket and screwed in the case screws. With that accomplished, I winched the Velcro strap down tight, and held the corner cap in place while attaching it to the motherboard tray with another pair of screws. These are not strictly necessary to hold the PSU in place during use, but they do add a bit of security during transport.
The last major step was, of course, running all the wires and cables to their needed spots. The generously-sized tray cutouts helped to keep the cables mostly out of the way, although some creative arrangement was needed to keep them from bunching up at the bottom. Here I should note that the intake fans are wired in a non-standard way: the live wire runs up to the switch box at the top before coming back down to the fan body. This allows the fans to be toggled between high and low speeds when connected to the Molex header. If you plan on using these fans with a fan controller bus or system-controlled motherboard headers, you’ll need to set the switches to “H” to get accurate speeds and voltages. The top exhaust fan uses a standard 3-wire header, with no fancy switches.
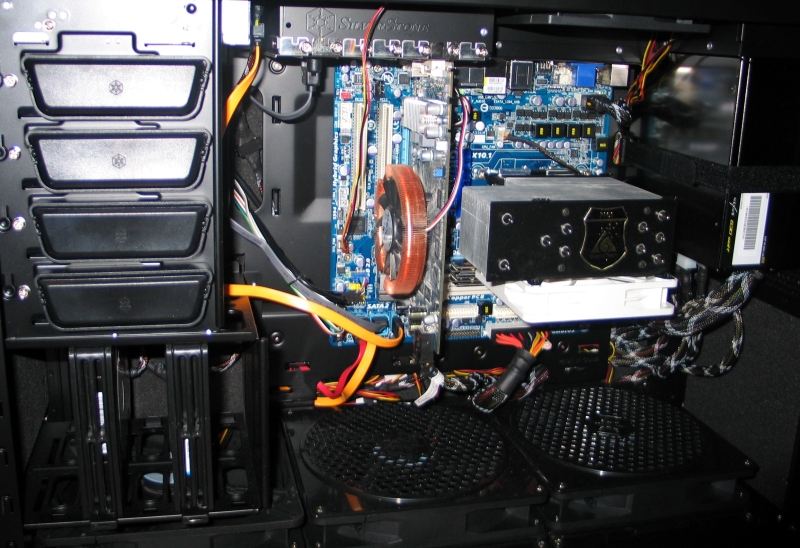 |
| Here’s the result of a half-hour’s work at installation, including a few re-reads of the manual. |
Conclusion
There’s a lot about this case to love. The styling is impeccable, and the combination of the rotated motherboard mount and pop-off top cover mean that it’s possible to have all your wires tied up in one neat bundle as it exits the back of the case wire-guide. The position of intake and exhaust fans ensures a straight-line airflow from bottom to top, which works with natural convection to get the heat out of your case in a hurry. The fans themselves are whisper quiet in normal use, and don’t make much more than a low hum when cranked to full. The combination of a solid, single-piece frame and copious use of acoustic foam make for a case that doesn’t vibrate, shake, rattle or flex. If this case fell off of your desk, you might worry about the parts inside, but you definitely would not worry about the case.
There are a few trouble spots that deserve mention, however. The tightly-packed hard drive caddies don’t allow for much airflow over the hard drives when all five are in use, which could be detrimental to the health of your drives. Reducing the number of drive slots by one in favor of spacing them out more would do a lot to improve airflow overall. There’s also no ducting to shunt the hot air away from the drives once it reaches the top, which could create a pocket of hot air in a tightly-packed system. The wiring harness for the intake fans, while cleverly done, is messy and unfortunately eye-catching.
Finally, there are a few considerations that have to be taken into account with regards to the rotated motherboard mount. First is a simple matter of size: this motherboard will not support an Extended ATX board, due to their increased width. Boards that are a bit wider than the norm, such as the ASUS Maximus III Formula, will fit, but it will be a tight fit. This also holds true for video cards: if your card is especially long, you’ll want to pay close attention to the clearance. While the vast majority of GPU coolers will function just fine with this vertical arrangement, any passive coolers that rely on heatpipes attached to the card’s backside will not work properly in this orientation. A blower-style cooler that exhausts heat out of an unused expansion slot will function best with this setup. Care must also be taken with the exhaust pattern of your CPU cooler: a tower-style cooler that blows its exhaust towards the “rear” of the board works best, as it lines up in a straight-line push-pull configuration with the rearmost intake and exhaust fans. Because of the large mismatch between the power of the intake and exhaust fans, this case has what is known as a positive-pressure environment when in use. This helps with pushing hot air out of the system, but can create major issues with dust if the intake filters are not regularly cleaned. You’ll definitely want to pop the door and clean them out every couple of months to keep things flowing smoothly.
The only remaining question is, is this case worth buying? At $240 MSRP, it’s certainly not for the faint of wallet, but what you get is a top-notch chassis. Possible clearance issues aside, the gripes mentioned are only small blemishes on an otherwise exemplary system. I can’t think of a better chassis in the mid-tower category, which is why I’m awarding it an Editor’s Choice award.


Absolutely awesome case. It gets better the more you look into it. Plus Silverstone does a really excellent job on the fit and finish of their products. A+ for the engineering team over there.