Introduction
You have your Touchpad in hand and are feeling adventurous, where do you go from here? Into the wide world of Linux of course! In this tutorial I walk you through how to install Ubuntu on your HP Touchpad so that it can run along side the existing WebOS operating system. We will be creating what is called a “chroot” environment for Ubuntu to run in. This tutorial is not for the faint of heart. We will be compiling things from source code and working with command line statements. If you can follow instructions, you should be fine. Questions can also be asked in the comments section, and I will do my best to answer them.
Before We Begin
It should be noted that the things we will be doing will clear out a lot of settings on your device. If you have any care for wanting to back things up, like your saved game in Angry Birds, we will need to do some extra prep work. Your documents and pictures that are save into the main media store aren’t touched (think the files you see when you plug the Touchpad into your computer and view it like a flash drive), so you needn’t worry about them. This section assumes that you have Preware installed. If you do not, a guide on how to do that can be found here.
Applications that you install from the HP App Catalog are backed up every 24 hours and will be reinstalled after everything is done, but applications that are installed by Preware are not so lucky. In order to backup our list of installed programs in Preware we will need to download an app called “Save/Restore.” Once the app is installed and while you are still in Preware, in the top left, open the menu and tap “Saved Package List,” then tap update. This will update the list with what packages you currently have installed. After that, launch “Save/Restore,” select “Save Application Data.” You can then select which applications you want to back up data for.
Now that we have all of our important data backed up, we are able to proceed to the next step.
Step 1: Setting Up The Build Environment
All of the steps that we need to do must be done in Linux. CYGWIN will not work, for those that know what it is, and neither will a VM as we have to connect the Touchpad to the Linux machine (USB pass-through may allow you to use a VM, but it is untested). This can cause some trouble for people that strictly use Windows. Luckily there is an easy solution for installing a copy of Ubuntu on your PC, just like you would install an application. When you’re done, you can uninstall it like a program and have no trace left. It is also a good way to familiarize yourself with the Linux operating system if you’re curious. You will need to download a program called wubi, it can be found here.
Once you are booted into Linux you will need to open a web browser and download the latest version of Java from their site. After Java is installed, open a terminal from the ( Applications > Accessories ) menu. Inside the terminal, type:
sudo apt-get update
sudo apt-get install git
After you have installed git, download and install the Palm Novacom software: 32-bit or 64-bit. This is the driver that will allow us to interact with the Touchpad.
From the terminal run:
git clone git://git.webos-internals.org/tools/meta-doctor.git
cd meta-doctor
mkdir downloads
We are now ready to get the file that we will need to edit to make our Ubuntu partition. From the terminal run:
cd downloads
wget http://palm.cdnetworks.net/rom/touchpad/p302r0d08012011/wifip302rod/webosdoctorp302hstnhwifi.jar
mv webosdoctorp302hstnhwifi.jar webosdoctorp302hstnhwifi-3.0.2.jar
cd ..
Leave the terminal open as we will be coming back to it in the next step.
Step 2: Configuring Meta-Doctor
We now need to edit the Makefile in the meta-doctor directory. Open the file with a text editor and uncomment the following lines:
ENABLE_DEVELOPER_MODE = 1
AUTO_INSTALL_PREWARE = 1
ENABLE_BETA_FEEDS = 1
VAR_PARTITION_SIZE = 2GB
Uncomment and change the following line:
EXT3FS_PARTITION_SIZE = 8GB
*Note* this is for a 32GB model Touchpad, if you have a 16GB model, you may want to lower the partition size to 4GB to save space. This is the partition that Ubuntu will save all of it’s files to.
To make things easy for us, change the following lines:
DEVICE = touchpad
CARRIER = wifi
*Optional* You can comment out the section about the CUSTOM_BOOTLOGO if you want to keep the standard HP boot logo, otherwise it will change it to a image of Tux the penguin.
Save the Makefile and switch back over to the terminal that we left open. Run the following command:
make all
Go get a coffee as it will take a while for it to finish building the file.
Step 3: Running Meta-Doctor
Now that we have our jar file created we can get down to business. Run:
cd build/touchpad-p302hstnh-wifi-3.0.2
At this point you should plug the Touchpad into your machine, but don’t put the Touchpad into USB Drive mode. Then run the following:
java -jar webosdoctorp302hstnhwifi-3.0.2.jar
This will run the webOS Doctor program. Follow the on screen prompts until it starts flashing your Touchpad. This will also take a while to run, so you can have a bathroom break after drinking all that coffee.
Step 4: Installing Ubuntu
When it finishes, the device will reboot and go through the first time setup procedure. Enter in all of your information like you did the first time. Make sure the Touchpad is plugged into the computer and type the following in the terminal:
novaterm
mount -o remount,rw /
mkdir -p /media/ext3fs
echo "/dev/mapper/store-ext3fs /media/ext3fs ext3 noatime,data=writeback 0 0" >> /etc/fstab
mount -a
exit
We have now set the Ubuntu partition to mount at boot time. We are now ready to install the program from Preware.
*Note* If you backed up your files in the beginning of the guide, now is the time to go through the restoration process. Open Preware and install “Save/Restore.” Run the app and select to restore Preware’s settings. A device restart is required after you restore the settings. Once the device restarts open Preware and tap the menu in the top left and select “Saved Package List.” You can then select install all and it should reinstall all of your Preware apps. After the apps are reinstalled you can use “Save/Restore” to restore the settings for the individual apps, provided you backed them up.
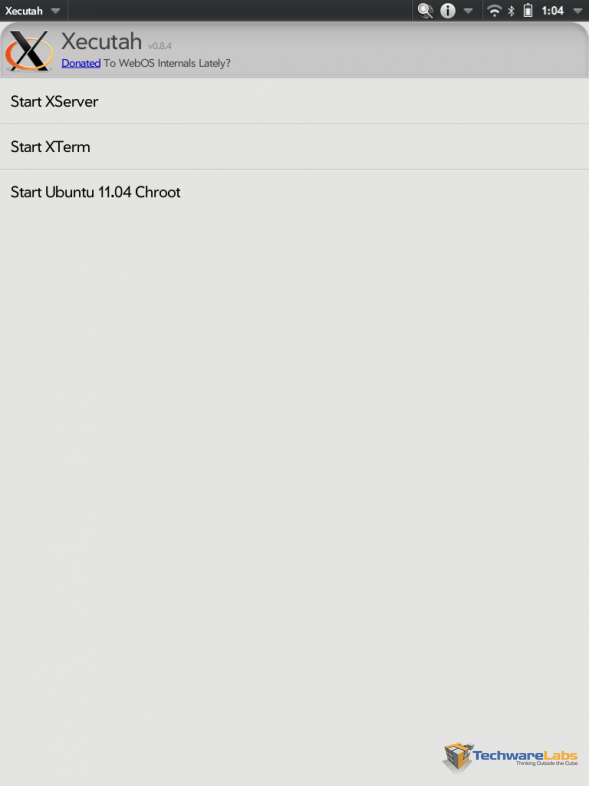
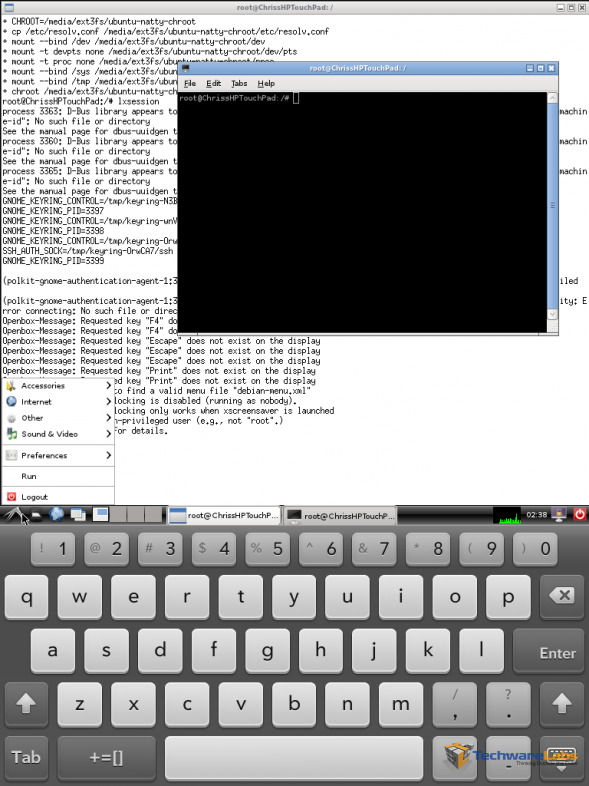
Continuing on, launch Preware and install “Xecutah,” it will also install “XTerm” and “XServer.” You can then install “Ubuntu 11.04 Chroot” from Preware. After that finishes, launch Xecutah.
You will then select “Start XServer,” this will open a new card with the X session, you will need to flip back to Xecutah and then run “Start Ubuntu 11.04 Chroot.” This will start the command line Ubuntu session in the X session that you already have open.
 |
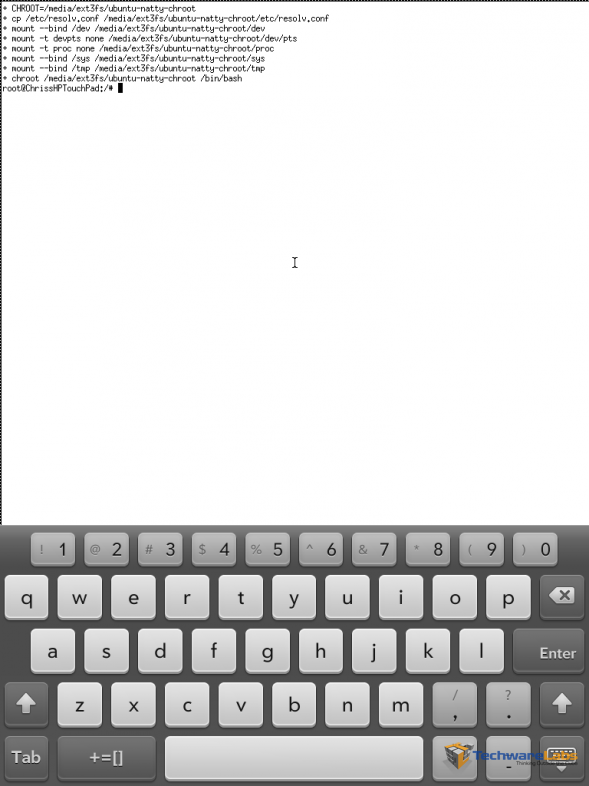 |
*Tip* You will want to change the size of the on screen keyboard to XS so it doesn’t cover up part of the X session. You can do this by holding down the keyboard icon on the bottom right of the on screen keyboard and then selecting XS. If you have a bluetooth keyboard and have no need for the on screen one, the app “Tweaks” in Preware can disable the keyboard when you run an X session.
Step 5: Wrapping It All Up
So where do we go from here? You can install a window manager to make the experience more enjoyable. I recommend using LXDE, as it’s light enough to run on the Touchpad without any issues. Some other alternatives are icewm and Xfce. Technically you could run a full blown desktop environment like KDE or GNOME, but they’re a bit too resource intensive to be practical. If you want to run LXDE, run the following command on your Touchpad:
apt-get update
apt-get install lxde
Once it is installed, you can start the session by running:
lxsession
Congratulations, you now have a fully functioning version of Ubuntu on your Touchpad. You can install any application that you can install on Ubuntu, assuming there is an ARM port of it. The potential is unlimited.
LXDE comes with Chromium installed and users have reported that Firefox, and the Flash plugin for those web browsers, appear to work as well. Other apps reported to work include the LibreOffice office suite, Transmission bittorrent client, and even VNC software for logging into a remote computer. I personally have had success using rdesktop to connect through an SSH tunnel to a remote machine. If you have any questions or comments, feel free to post them below.
For more ideas on what to do with your Touchpad, be sure to check out our Top 10 Things To Do With Your HP Touchpad.

I would like to know if I plug in to my desktop to do all of this?
I don’t know if you still monitor this thread or even if the procedure is relevant at this point. On version 3.05 of .jar file I can’t get the touchpad to flash at all. After plugging it in I can go through the steps but when it goes to actually flash the touchpad it won’t go any further.
Has anyone actually got it to work using your procedure or is it more theoretical at this point?
Oh, well. I tried.
You can just send me an email at chris@techwarelabs.com and I will do my best to help.edit: Due to a large number of e-mails, I ask that anyone who has issues with their Touchpad please submit it in the forums. This way everyone can benefit from the troubleshooting and it will help minimize a lot of repeat questions.
thank you, i sent it in an abi word file on an email. please let me know if you can see what went wrong and how to fix it i would really appreciate it. i need a tablet with a pdf editor on it for my job andweb os doesn’t offer any
Failed again… I will try a few other ideas later. It looks like I should focus here.
Sep 21, 2011 2:31:44 PM com.palm.nova.installer.recoverytool.CardController logPrint
INFO: Trenchcoat: mount: mounting /dev/mapper/store-ext3fs on /tmp/tcmnt_2905/media/ext3fs failed: No such file or directory
I was just able to rebuild and flash it successfully with the new version of meta-doctor. I would try redownloading the .jar file in step 1. I would then clean the build environment by running “make clobber.” Then try rebuilding and flashing again. See if that works for you.
hey Chris thanks for the tutorial it was helpful although I have been having some issues with the step with the “make all” command. I didn’t want to fill up the comment feed with my terminal text. If you could get back to me I could shoot you an email with the error or something I would appreciate it.
Is it possible to wipe out the Touchpad and have it so it only runs Ubuntu. Thats what I am looking for….
Unfortunately at this time there is no way to completely wipe out WebOS and solely run Ubuntu.
This didn’t flash for me. I tried twice. The first time, I uncommented “ENABLE_BETA_FEEDS = 1”, second time I actually added in “ENABLE_TESTING_FEEDS = 1”, but left the first one commented. It’s not making it out of the third step. My 64gb touchpad is stuck on a screen with a processor and arrow. I’m not sure what percentage it fails at, but here’s what is left in my terminal:
[Removed terminal output as it was clogging up the comments and didn’t really provide much info -Chris]
It looks like the Meta-Doctor MakeFile has been updated within the last week. The version that I had when I wrote the article didn’t have anything for Beta or Alpha feeds. I’m going to try the new version on my 32GB Touchpad and see if I get the same result as you.
Don’t forget to save a copy of the old version…
I’m attempting again, with a few other tweaks.
This is all going on a 64GB.
This article would be worth the bandwidth used if it actually shared how the performance was and if it was even worth it. The HP touchpad sucks stock but if ubuntu unlocks hidden power – hell yeah it makes this little tablet worth even more. So please good sir tell me about this ubuntu power you say you can unlock. Is it worth it?
If you read the article, you can see that the Ubuntu install is running in a chroot mode, this means it is running natively on the Touchpad’s hardware without emulation. Performance will therefore be comparable to other ARM devices that can run Linux. Performance will also be dependent on what modifications you’ve done to your Touchpad. If you’ve overclocked it and disabled unnecessary logging, like is detailed here, then your performance will obviously differ.
As far as unlocking hidden power, if you can’t see the advantages to installing a fully functioning version of Ubuntu on your tablet, then this tutorial may not be for you. As I made note in the wrap up, since there isn’t a good Terminal Services client for WebOS, I was able to install rdesktop through Ubuntu and was able to access remote machines through that. There are many other advantages to having full fledged Linux apps with you on the go.