Interior
 |
 |
 |
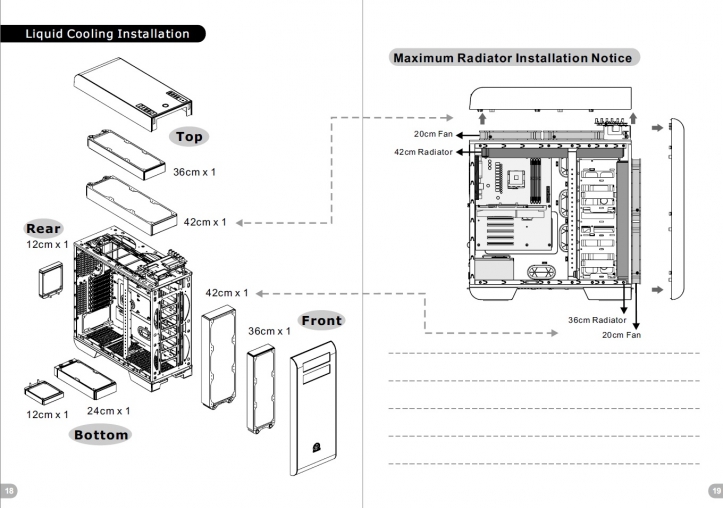
Inside the case we see the large CPU cutout, cable management holes, and 8 hard drive cages. Thermaltake went for a “fully modular” design with this case. The cages themselves are removable to allow easy access to drives and are split in to three separate sections which are independently removable. This design allows you to only use the cages you need, letting you open up the rest of the front for more airflow.
You can also remove all of the sections as well as the support bar and the interior 5.25″ bay to completely open the front of the case for maximum airflow and radiator mounting possibilities.
 |
 |
 |
The power supply sits on rubber feet on a crossbar that elevates it above the bottom of the case. There is a vent directly below it to supply fresh air as well as room for two more 120mm fans in front of it.
Behind the motherboard tray we can clearly see the cable management options. You have grommeted holes in the key areas and various punch-outs for zip-tying cables to. A very cool feature of the Core V71 is the ability to mount up to 2 drives on the back of the hard drive cage. This allows you to hide your drives in the back of the case and remove all of the cages to maximum space inside.
You get about a half inch of space between the motherboard tray and the edge of the case, but with the extra space provided by the door bulge that increases to about an inch which is plenty to route even a 24-pin power connector without having to force the door on.
Installation
 |
 |
 |
Installation went without a hitch for everything but the cooler. The board dropped right in, the PSU bolted up, and the HDD and SDD mounted to the back of the mobo tray no problem.
I planned on top-mounting the radiator like normal but realized that the only way to do that with a 360mm rad is to remove the internal 5.25″ bay. Not only does this cut your usable bays down to just one, but when you install something in the top bay it doesn’t sit flush with the front of the case due to the curvature on the top.
So I instead decided to mount the rad at the front of the case. The problem here is that the hoses are not quite long enough to reach unless you bring the fans inside. When you do this it’s then not possible to reinstall the hard drive cages.
 |
 |
The cable management holes worked great but I would have liked to have more places to zip-tie cables to. Installing the drives on the back of the HDD cage was very simple, but I found that the bottom drive is a little too close to the bottom of the case which makes the cables bend more than I’d like and there was clearance issues with using a 90 degree cable. Even with every cable in the case routed around back I could still easily close the door.
With everything installed and the side panel on the case looks great. With a side windows this big though you have to make sure your cabling is perfect because you can see everything from top to bottom.
