Modifying the Seagate 1.5TB Hard Drive: Unleash the Hidden Performance Within
![]()

Introduction
As many of you know, recently Seagate released one of the largest consumer drives on the market: the Seagate Barracuda 7200.11 ST31500341AS . The drive’s capacity is 1.5 TB (1500 GB) or approximately 1.397 TB. The drive specifications are decent and Seagate itself announced that this drive will be able to handle 120 MB/sec sustained transfer rate. All of us know that these rates will not be across the whole drive and were most likely obtained under the best possible conditions. That being said, we still can not overlook the fact that a 1.5 TB drive’s speeds place it directly in the Velociraptor territory. After discovering this astonishing speeds people normally bust out their Western Digital Velociraptor drives and start benchmarking them for comparison. So, what do they get? Velociraptor obviously wins in all categories – max speed, min speed, average speed, access time, you name it and it wins it. At this point they label the Seagate drive as second best and close the case. Of course thats the point, the Seagate drive was not meant to compete with the Velociraptor which is a performance drive and is instead targeted towards good performance and high storage capacity. So end of story right? . . . What if I told you there was a way to modify the 1.5TB Seagate to unleash the hidden beast within. . .
I decided to take the matters a step further. The WD Velociraptor is the largest “Raptor” class drive available on the market with the capacity of 300 GB. Despite the fact that it is the largest out of the lot, you still have a 300 GB drive compete against a drive that is basically five times its size. Normally, the giant will not stand a fighting chance, (look up David and Goliath if you don’t believe me) so I decided to even the fight out a little. What kind of speeds would you get if you were to take the large drive and downsize to the size of the Velociraptor? I decided to find out.
Prep for Surgery
Though really in this case we are not going to open up the drive, flash the firmware, or do cutting of any kind.
What we did to the 1.5 TB hard drive was to shrink it. There are a 5 easy steps you have to follow in order to accomplish that.
1. Download SeaTools DOS version from the Seagate website.
2. Burn the ISO onto a blank CD using any standard CD burner.
3. Put the burned CD into the CD-Drive and restart your computer.
4. The CD will boot automatically into the software’s graphical interface at which point you must click “ACCEPT” to the licence agreement.
5. Click the drive labeled “ST31500341AS” by left clicking the name.
|
|
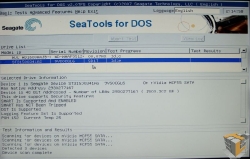 |
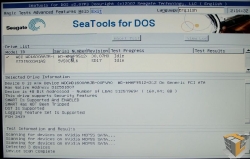
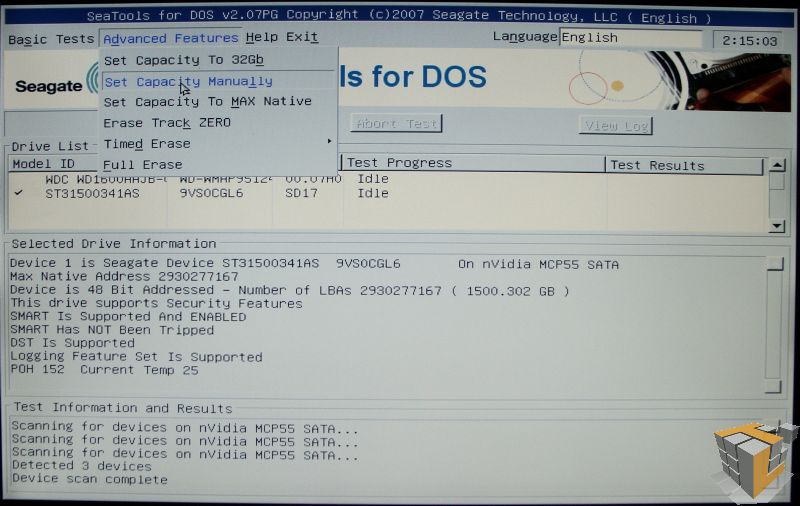
6. Go to the “Advanced Tools” tab and select the “Set Capacity Manually” option.
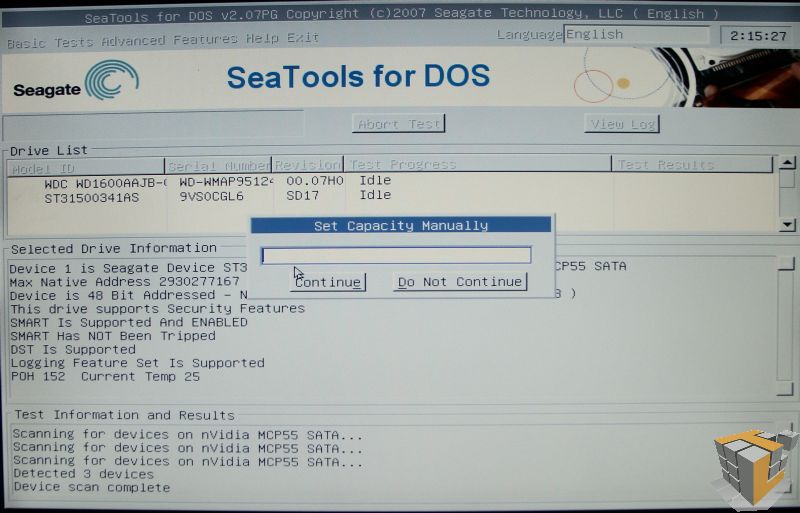
7. Once you have done that, a blank dialog should appear. Enter the amount of LBAs (Logical Block Addresses) you want your “new” drive to have and click “Continue”. The magic number for the 300 GB mark is 589080586. For reference the max number that you can enter into this field is 2930277167 which equals 1500.302 GB.
 |
 |
8. The confirmation message should look like the screenshot below. Once you achieved the confirmation, you are done. You can take out the CD and press the reset button or click “CTRL + ALT + DEL” to restart your computer.

**Note: The “Set Capacity Manually” only accepts LBA number so if you put something like “300 GB”, the software will set the size to zero and you will have to shut down the computer, restart and put the correct number into the Box. Also, after the capacity has been set, the software can not alter the size unless you completely Shut Down your computer, a simple Reset will not work.
After you set the size less than the maximum capacity, the remaining space will be invisible to the system and thus rendered useless. (If you downsize the 1500 GB drive to 300 GB, the other 1200 GB would be invisible) The drive will effectively become 300 GB in size.
Now I can hear you all screaming “What happened to 1.2TB worth of my drive space?” As I mentioned the drive is now a 300GB drive for all purposes. Look at it this way, the 300GB Western Digital Velociraptor is approximately ~$229 while the price of the Seagate 1.5TB drive is approximately ~$119 at the time of this writing. Now what you end up with is a drive that is higher in performance in all regards except seek times at a lower cost per GB. We are all about getting more for less around here. The added benefit is that you can always go back and reclaim that 1.2TB at any time, try to expand the Velociraptor at a later date (good luck).

Perhaps someone, preferably an everyday computer user, with this type of hard drive could try the hack and let us know how it performs. If I had one I would give a whirl. In my opinion it would be worth it up to the point of being full, then you could always move on to the 819 GB setup.
Thanks for the review Artiom.
Chris: “while partitioning the drive does allow similar effect, it is not the same”
Yeah, it’s not the same… it’s something that actually has some sense in it, unlike capacity clipping HDD on firmware level.
___
Chris: “If you do have it partitioned, anything accessed on the 1 partition would be the fastest, however if you try and access anything on the other partition at the same time, the performance would drop significantly”
Yeah… which is why you would install OS and all applications on same partition, and leave the second partition for stuff like movies, mp3s, OS back-up images… stuff that you don’t need to load while booting OS or load heavy applications.
___
Chris: “Saying that you won’t access the second partition whenever you want to use the first isn’t really practical either”
Eh… on the contrary, if you for example store HDTV movies, and other rarely used, very big files to the remaining 1.2 terabytes of space, you really don’t need to read those files while booting OS, loading WoW or basically doing anything else than watching them (and watching them is done by loading a small non-bloated application like Media Player Classic).
Really, I see absolutely no damage in using the leftover space for stuff that is rarely accessed.
This “hack” is the most bafflingly idiotic hack I’ve ever read. It’s a very bad variant of a VERY old partitioning hack.
___
Artiom: “This means that there is no guarantee that all of the LBAs are going to be on the inside of the drive which is what gives it the boost it needs.”
Except the inner tracks are the slowest. rpm is same on inner and outer diameter, but on outer diameter, the circumference is bigger, thus more bits travel below the R/W head in a time interval.
can this hack be done on other drivers from seatgate maybe like the 1T version….?
Yes performance, yes cheap price. What about reliability? This is often overlooked. I’ve had nothing but trouble with seagate drives. I would rather spend a bit more for quality/reliability.
Why downsized the 1.5tb offering ?
Just buy the 320gb version ?
http://www.seagate.com/ww/v/index.jsp?locale=en-US&name=st3320613as-barracuda-7200-11-sata-320g-hd&vgnextoid=e7c048e03b758110VgnVCM100000f5ee0a0aRCRD&vgnextchannel=47f281f8c0f43110VgnVCM100000f5ee0a0aRCRD&reqPage=Model
Actually my experience is exactly the opposite. Seagate drives have time and again proven themselves much more reliable than most of the competition. I recommend either Western Digital or Seagate to everyone.
I, on the other hand, recommend everyone stay way from WD and Seagate and heavily favor Hitachi and Samsung.
(OK, WD has gotten its act together, but I still won’t ever forgive them for the _8_ (yeah, 8) RMAs he had to go through…started with a 20gb and ended up with a 120gb, all failing in a 6 month period. Oh, and the 50% WD RMA rate at our shop… ugh)
getting more for less is what it’s all about. That’s why we overclock.
So, for the price of 1 Velo, i could buy two of these and RAID 0 them. I’m assuming a RAID 0 of these would destroy a single Velo, for the same price as that single Velo?
This is a rather misleading article. There is no way that you can simply ignore the superior seek time of the Velociraptor and just dismiss it as a minor difference. It’s the seek time of the velociraptor which makes it so desirable, not the sustained transfer rate. The seek time is what reduces stuttering in games for example, sustained transfer rate just makes things like defragmenting the drive faster.
The problem with just partitioning the drive is that windows does it dynamically. This means that there is no guarantee that all of the LBAs are going to be on the inside of the drive which is what gives it the boost it needs.
I have learned that The outside of the drive is the fastest.
There is no benefit in making the rest of the disk invisible. Partitioning the drive does exactly the same thing. This tecnique is old, and I’ve seen reviews on several other sites (tom’s hardware being the first that comes to mind).
Think about it, while partitioning the drive does allow similar effect, it is not the same. If you do have it partitioned, anything accessed on the 1 partition would be the fastest, however if you try and access anything on the other partition at the same time, the performance would drop significantly as the drive’s head has to move to the other sectors on the second partition and then back to the first. So in fact partitioning it in two would not have the same effect as this method if you plan on actually using the remaining space. Saying that you won’t access the second partition whenever you want to use the first isn’t really practical either.
Instead of changing the LBA value, all you have to do is partition the drive to use the first 300gb or whatever you want for your system drive. There is NO benefit in making the rest of the drive invisible. You could still be using the remaining 1.1~1.2 tb for data.
Well Captain Obvious, you should know that there IS a difference. and as Captain Obvious, you should have found this:
http://enterprise.media.seagate.com/2009/07/inside-it-storage/the-fastest-gaming-drive-alive-barracuda-7200/
Apparently, even Seagate agrees 🙁
where IS the difference?
I wonder if this trick would work on a Seagate’s FreeAgent 1.5 TB External hard drive?
Even if you could do it (I don’t believe you can) you would still be horribly bottlenecked by the USB 2.0 connection. It doesn’t look like the FreeAgent line have an eSata connection, which is what would be required to see any benefit from this hack.
It’s not a USB drive. You’re looking at an ad listing a usb drive for sale.
LOL what`s the point making this on externall hdd? when USB can`t handle even close performance to S-ata. Or Do you have Firewire B rack?